Hi all,
As you know the weather is on the turn and our old heater motors, if they work, are a little under powered compared to modern vehicles.
Well the one in the 3.0 doesn't work at at all and the only way to clear the windscreen fully is to drive it. This is a little hard as you cannot see as much as you would like, even with the aid of a de-misting pad.
I know we can still get new, original Bosch motors but I have a Behr motor in mine so I am going to do something a little different.
Not revealing what my plan is yet, but I will be cracking on with it in the next few days.
Will upload some pictures tomorrow when it is starting to take shape.
Fan/Heater assembly

Re: Fan/Heater assembly
You're going to make a turbojet powered heater?Ghia15 wrote:Not revealing what my plan is yet, but I will be cracking on with it in the next few days.
I've guessed it haven't I?
Since I got a capri I've said "over the moon" a lot more than ever before.
-
Ghia15

- Donator

- Posts: 2585
- Joined: Wed Jul 30, 2008 10:14 pm
- Car(s): 1981 3.0 Ghia (Restoration Project), 1982 2.0's (Long term project), 1993 BMW E34 520i, 1999 Volvo V70 (Sold to the Parents)
- Location: Reading
Re: Fan/Heater assembly
Well, that probably would sort out the heat requirement of it.
Not quite though.
Should be done this week all being well.
Got a replacement matrix coming to me from Martin as the one I was going to use has a major blockage.
He is also sending out the dimensions I need for the aperture in the bulkhead so when that all gets here I should be fitting it in and posting up the finished article.

-
Ghia15
- Donator
- Posts: 2585
- Joined: Wed Jul 30, 2008 10:14 pm
- Car(s): 1981 3.0 Ghia (Restoration Project), 1982 2.0's (Long term project), 1993 BMW E34 520i, 1999 Volvo V70 (Sold to the Parents)
- Location: Reading
Re: Fan/Heater assembly
Well the time has come to show you all the progress of the new heater box assembly for the 3.0.
Sorry about being mysterious on this one but wanted to iron out the kinks before I showed you guys.
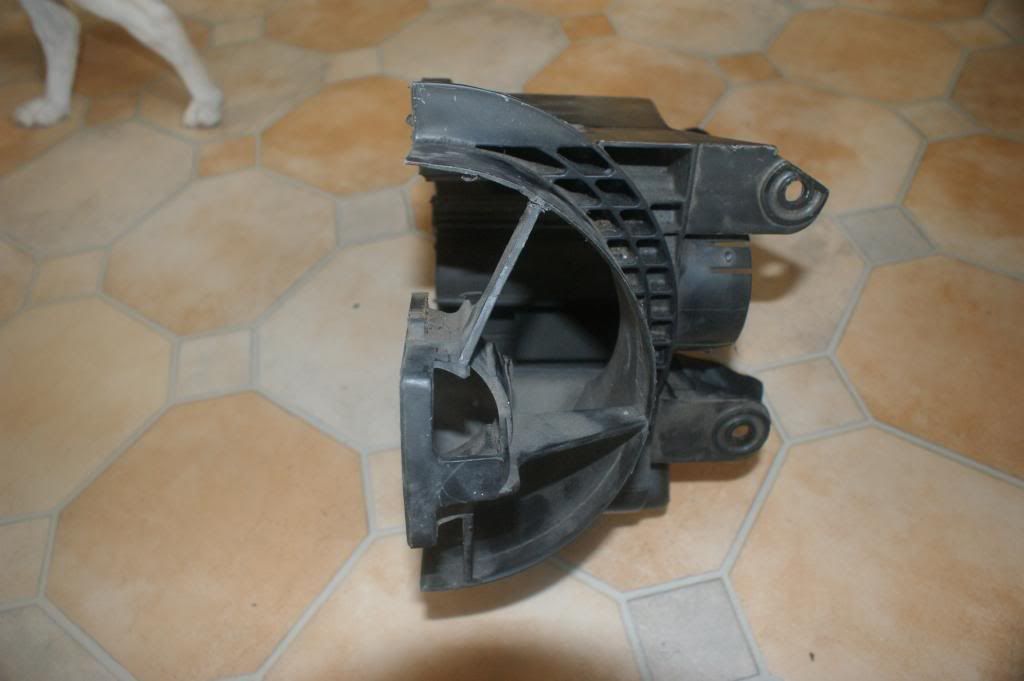
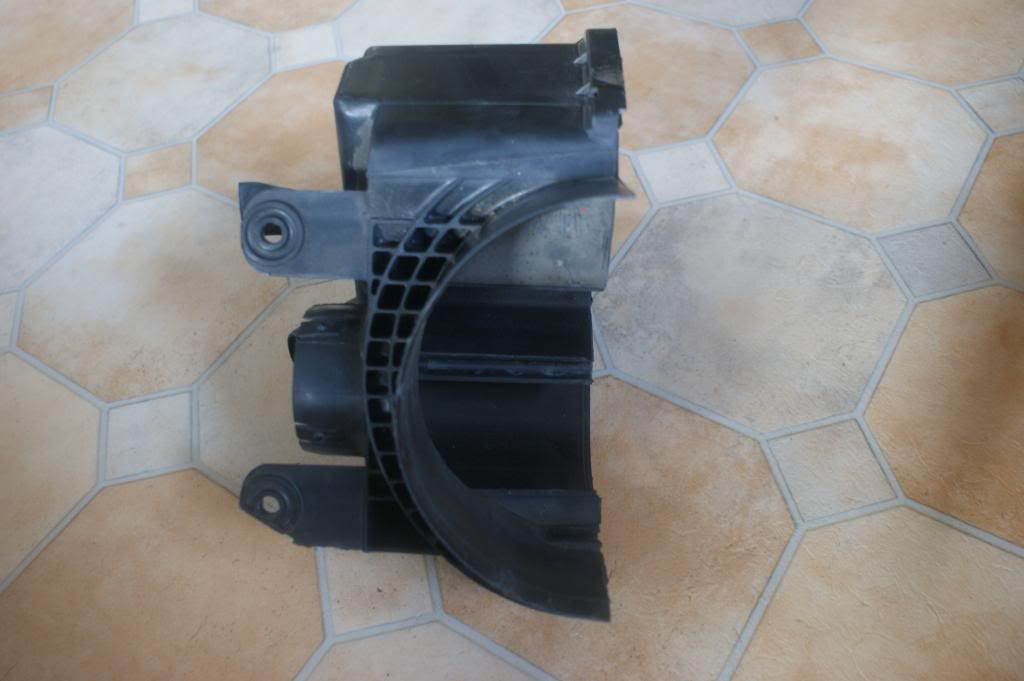
As you all know this is the profile of a std heater box
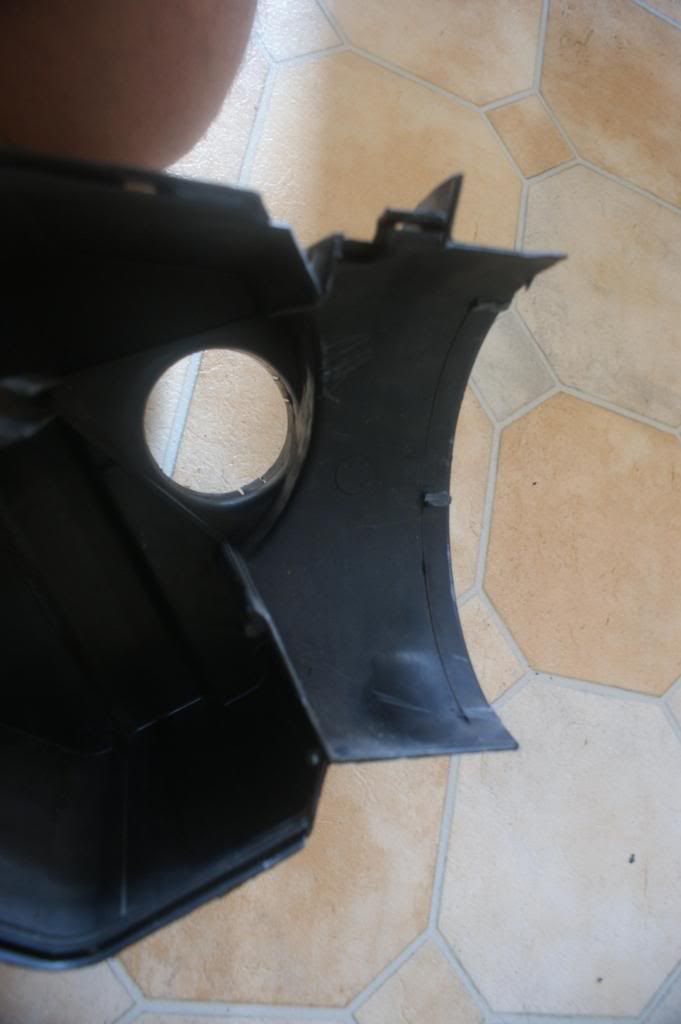
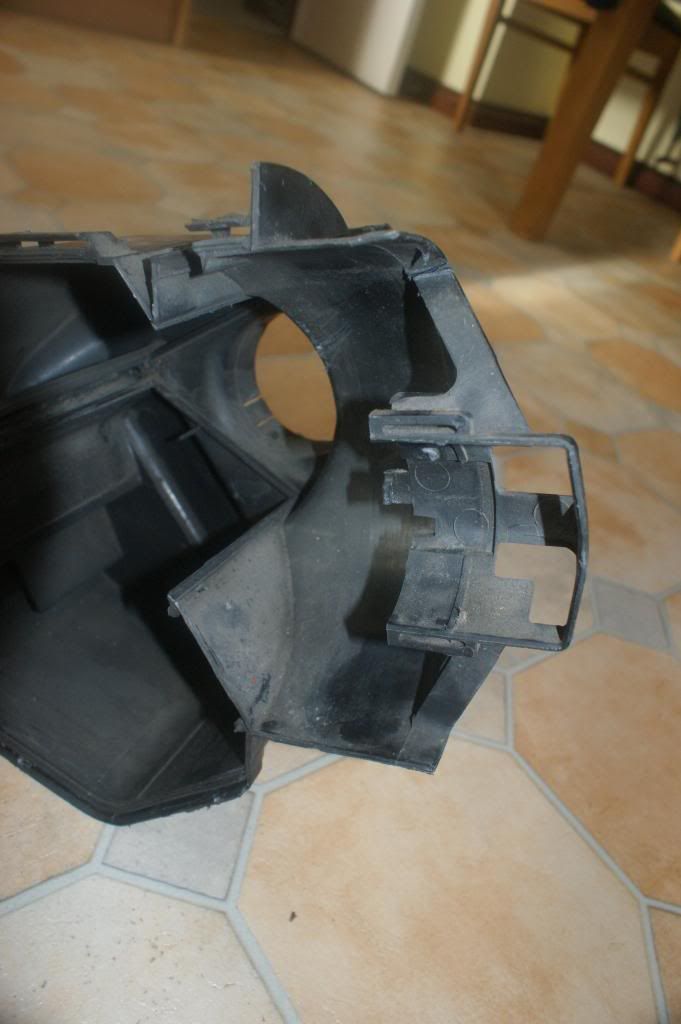
I set about cutting the supports for the original BEHR motor to fit in the new motor.
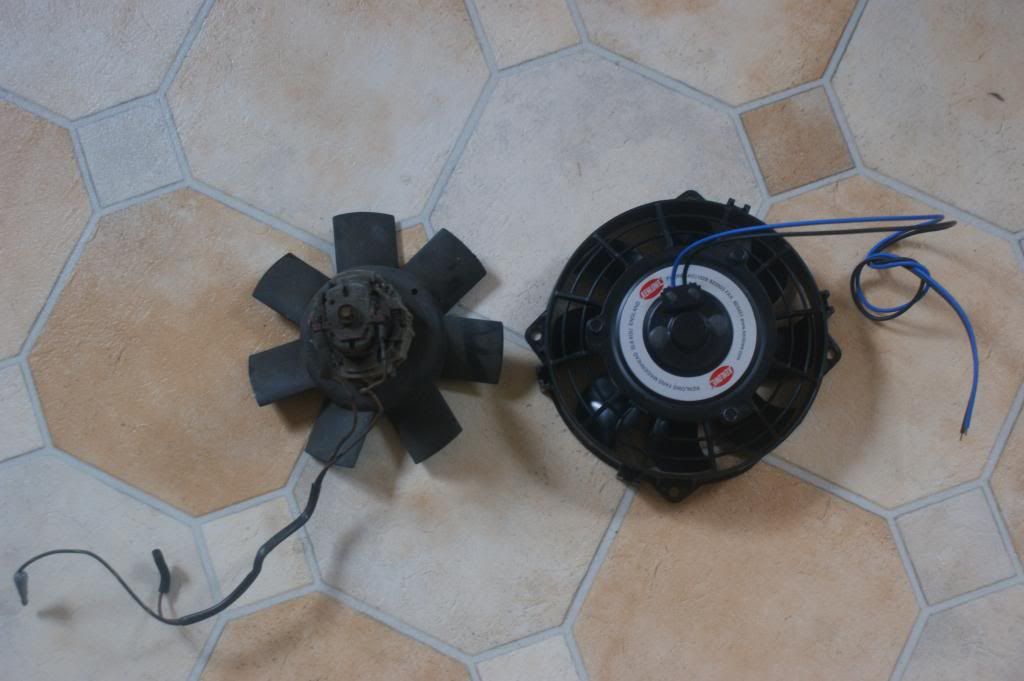
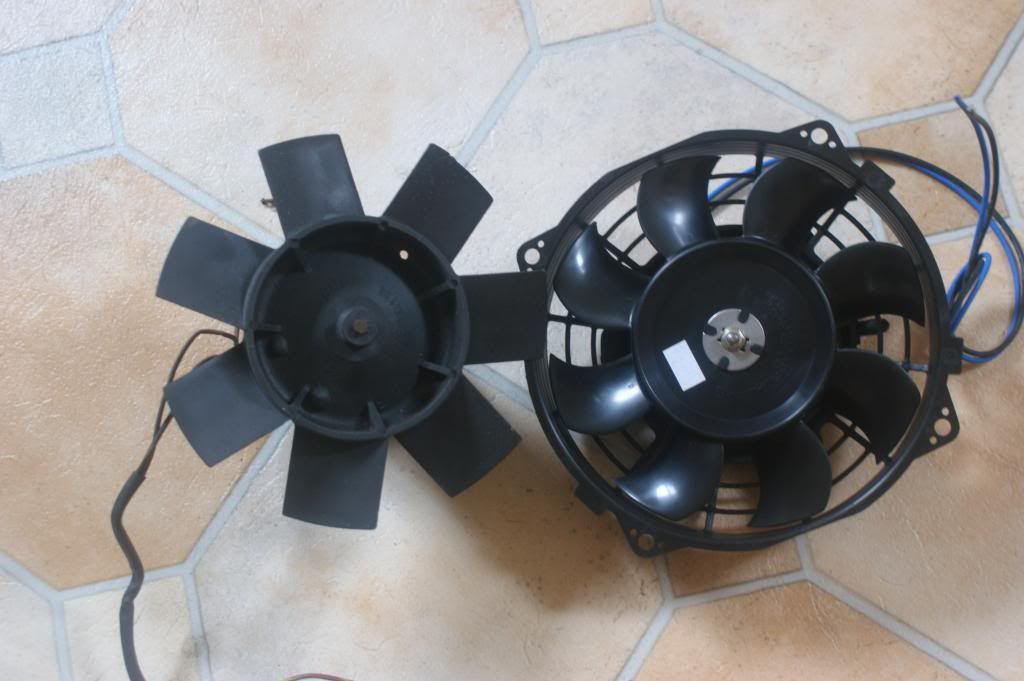
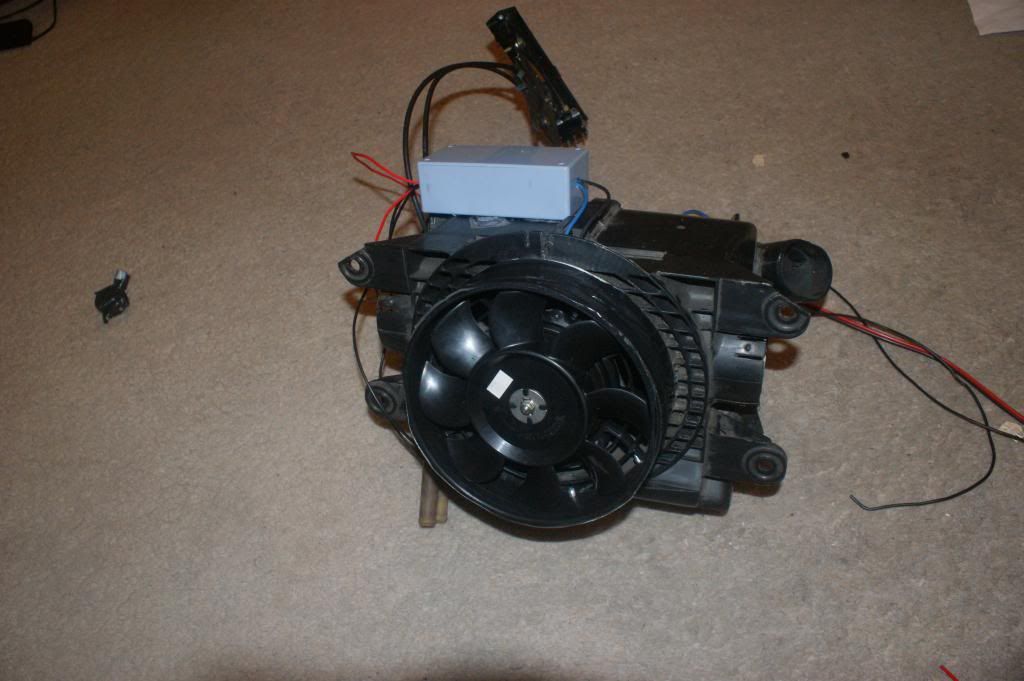
Comparison of the new and old motors and fan blades.
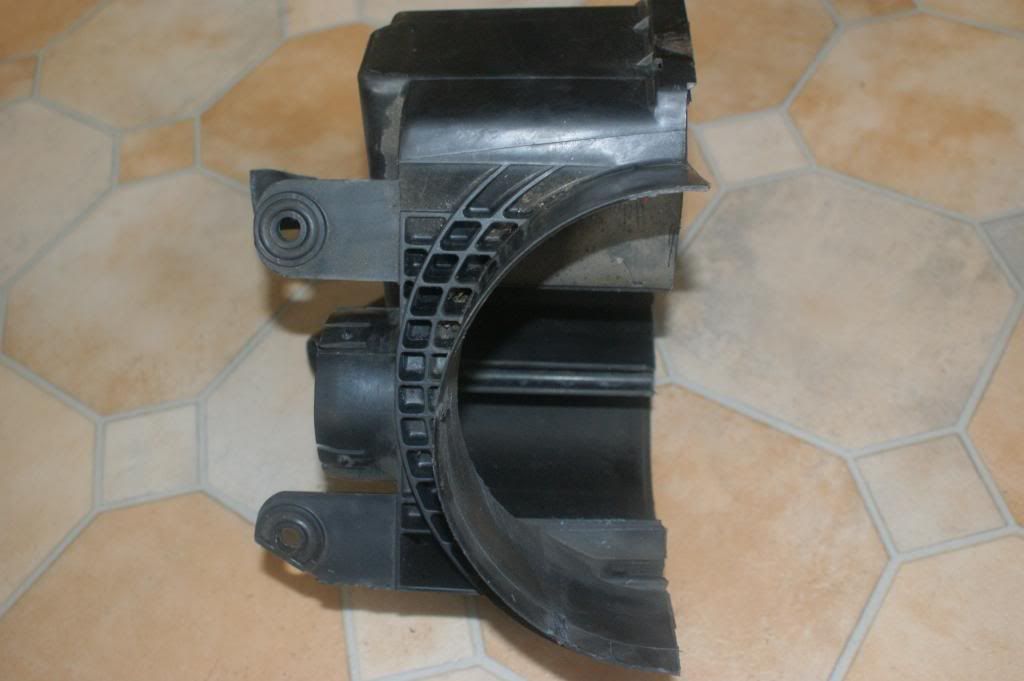
I got lucky that the original fan shroud is 7 inches which allowed me to get a 7 inch radiator fan to fit in there.
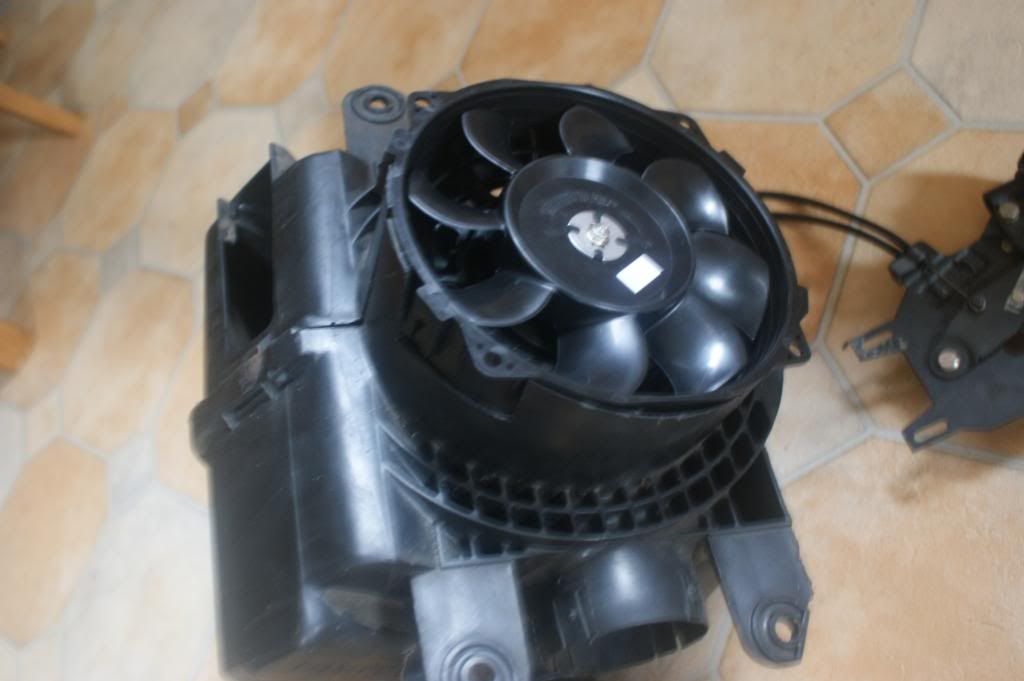
The new fan fitted into the heater box, riveted to one half of the heater box to secure it in place.
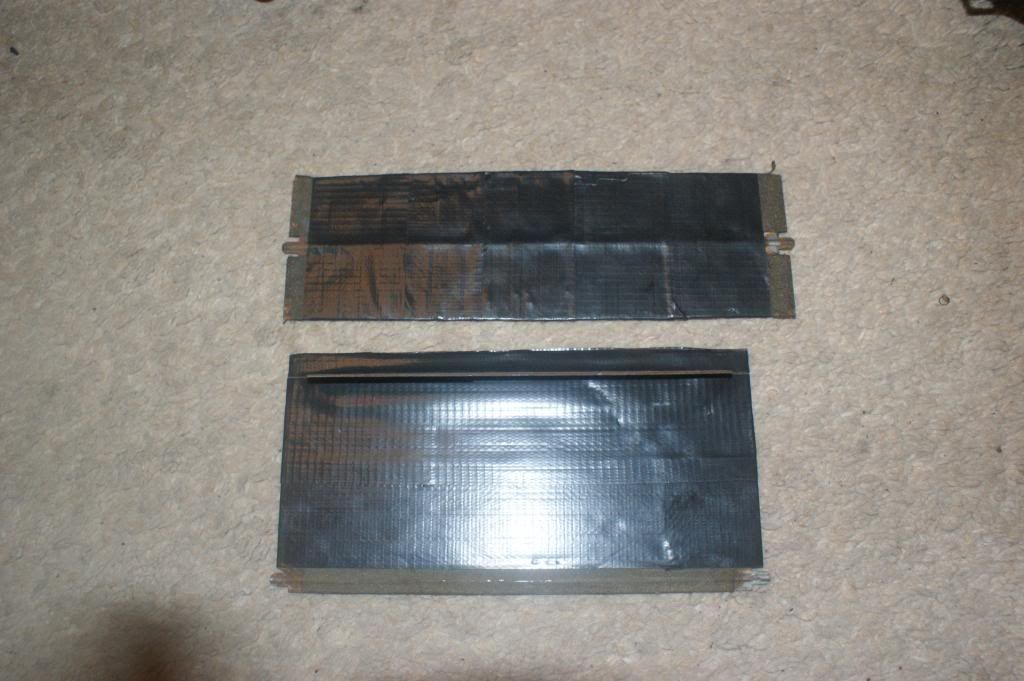
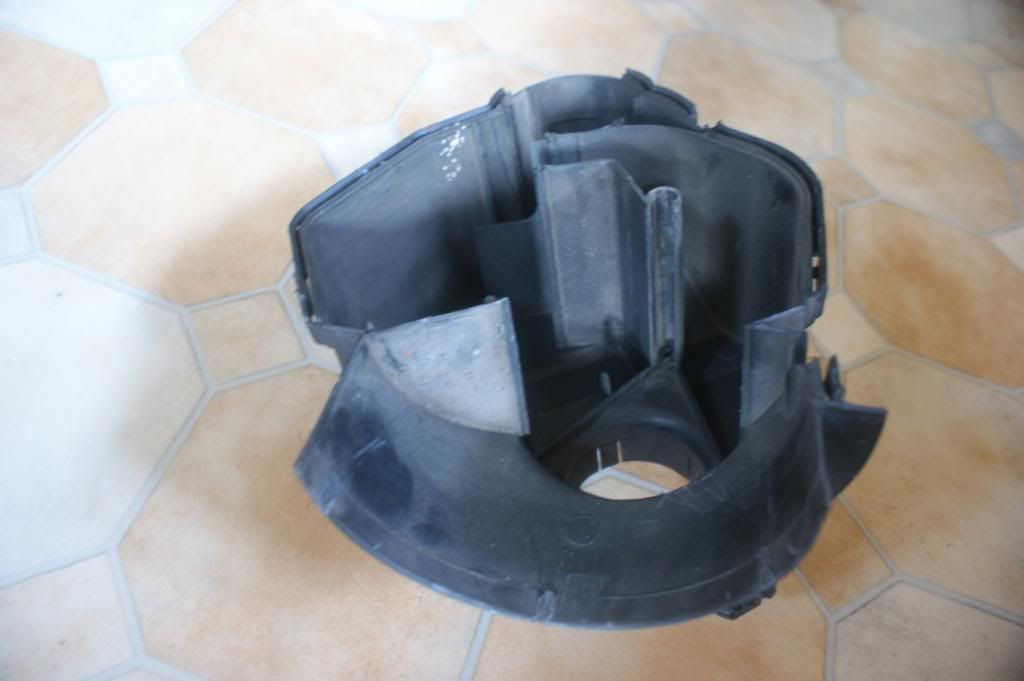
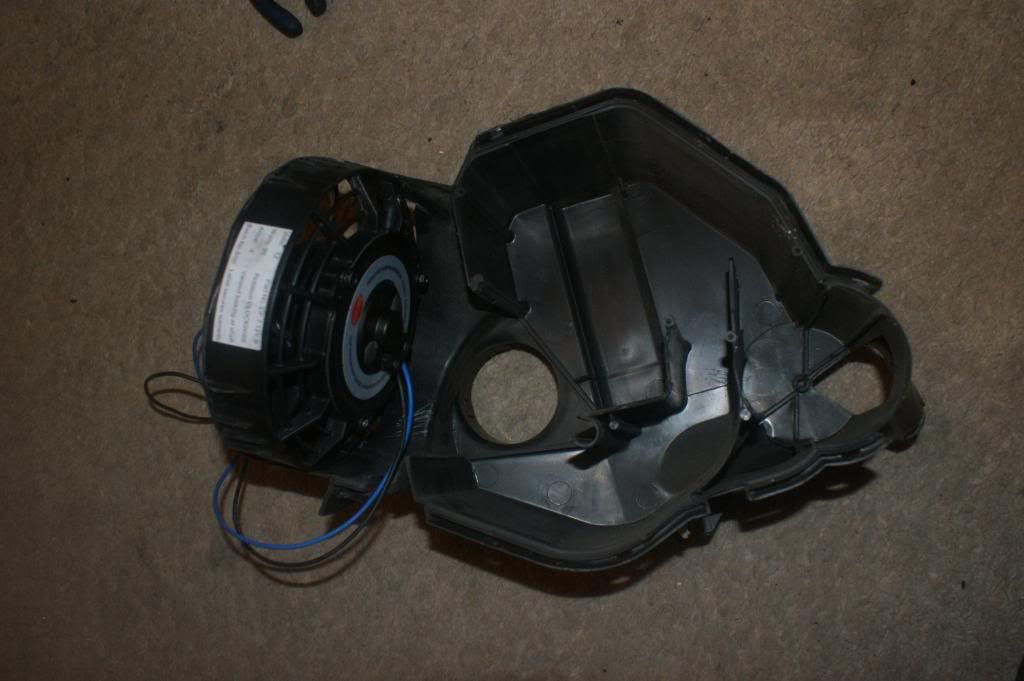
The plates from the internals of the heater box. I scraped off the old foam, it was coming off anyway, and I wrapped them in duct tape.
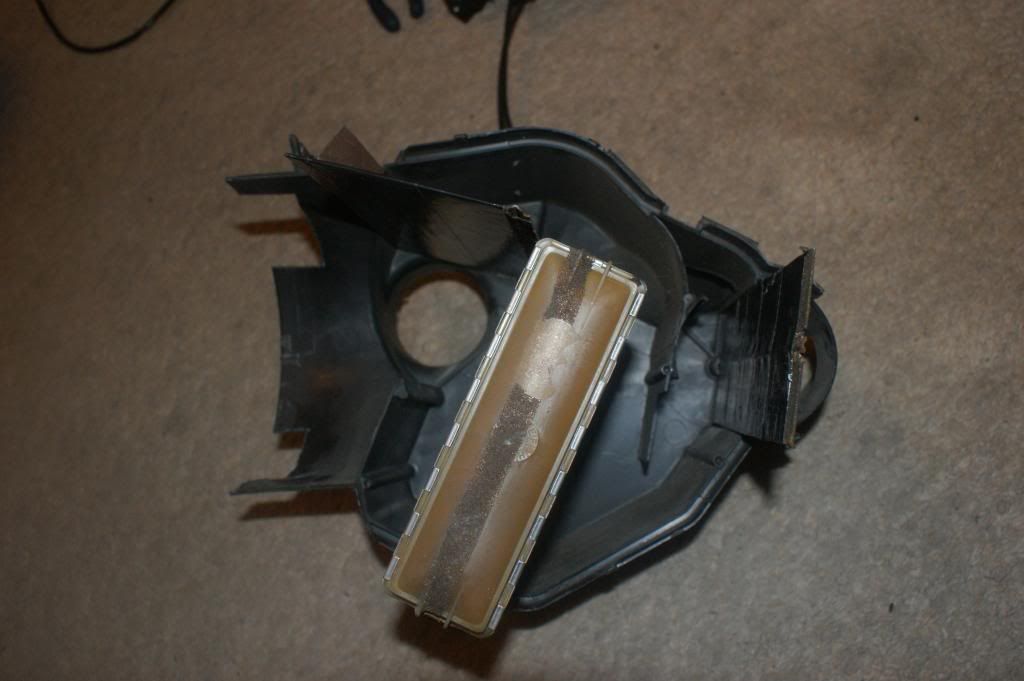
Plates fitted with the replacement matrix, Big thanks to Martin at Caprigear for getting that out so quick.
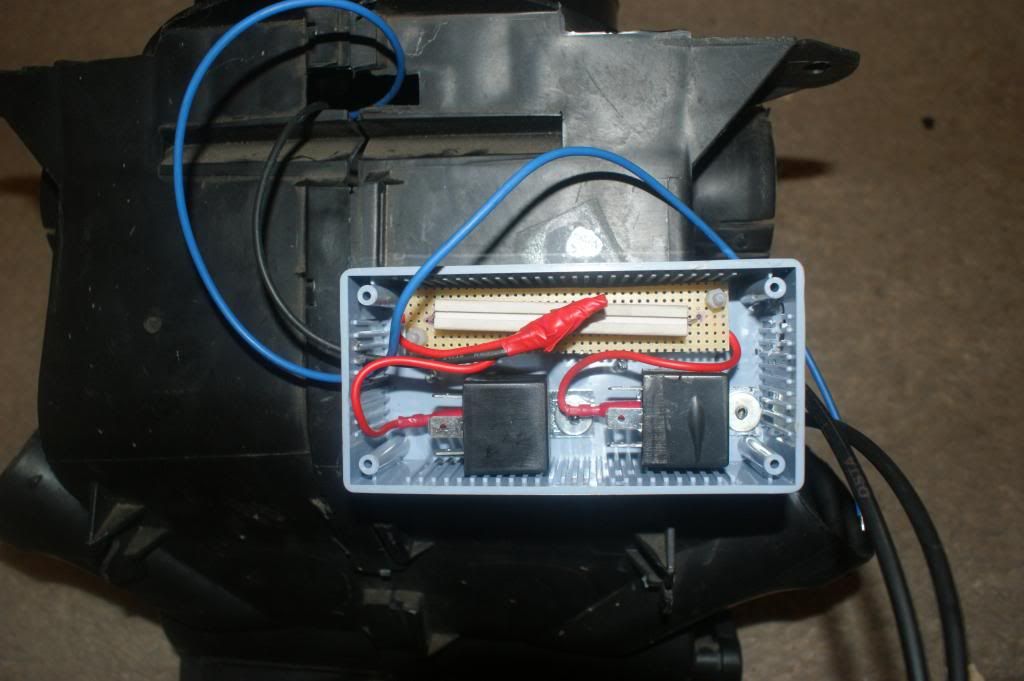
The wiring for the fan. I'm going to use the original switch to run the fan but I am using two relays to ensure I don't burn out the capri wiring. One relay is running a straight 12v direct from the battery while the other is using a 5 ohm resistor to sort out the slow speed option.
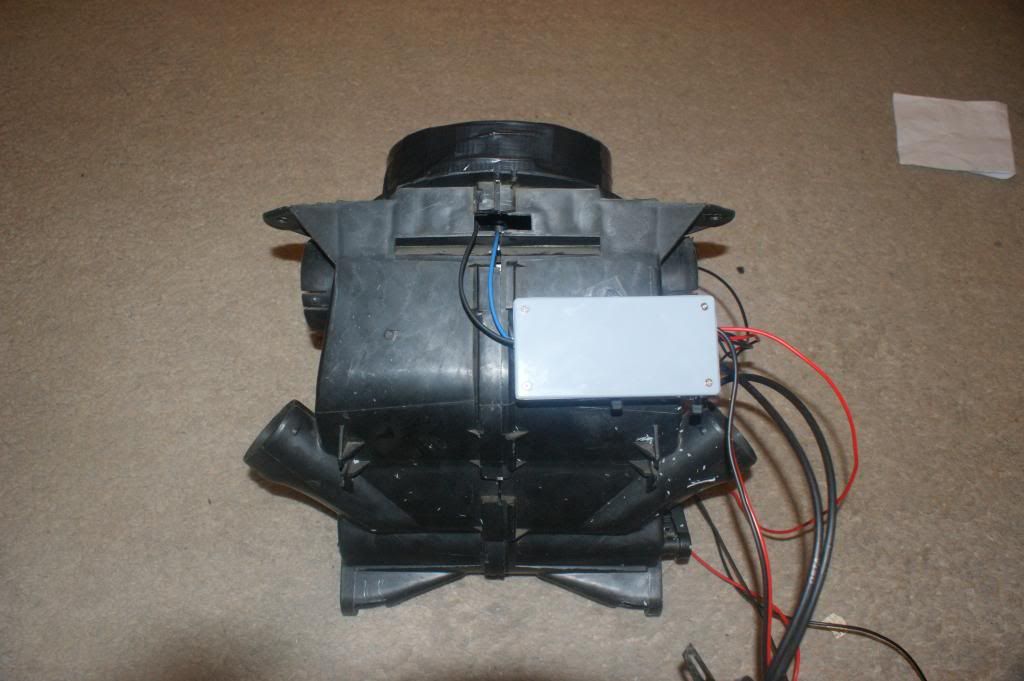
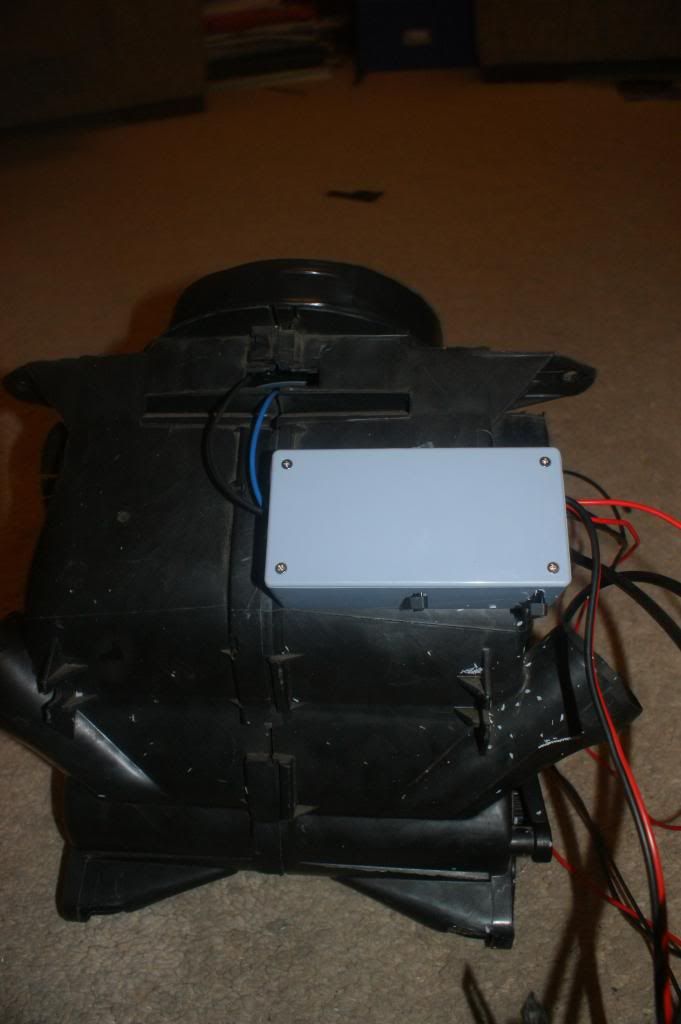

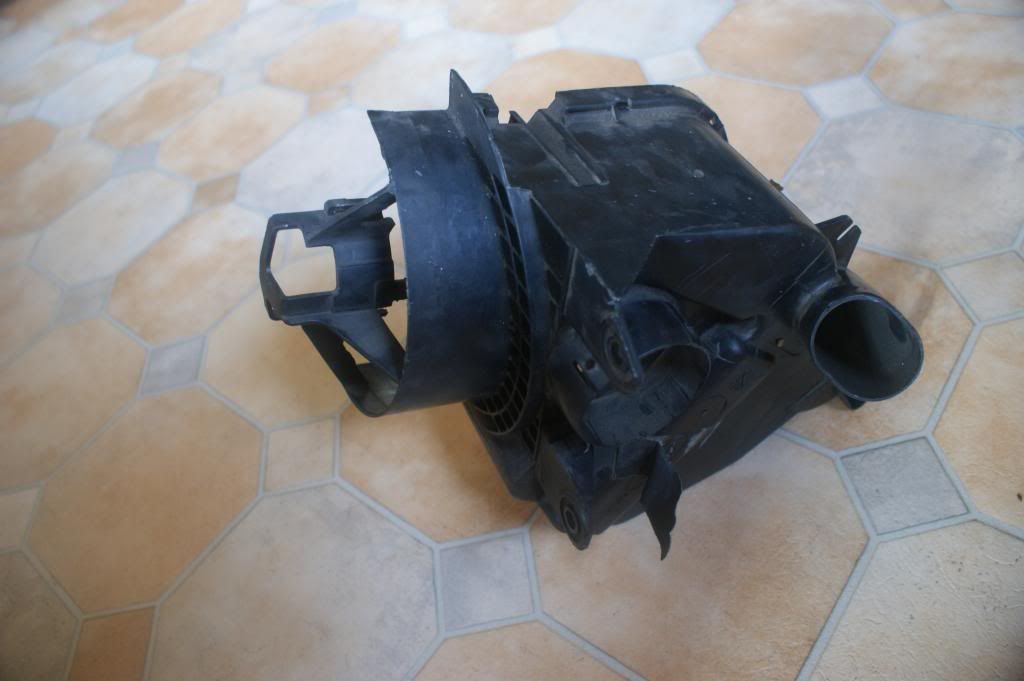
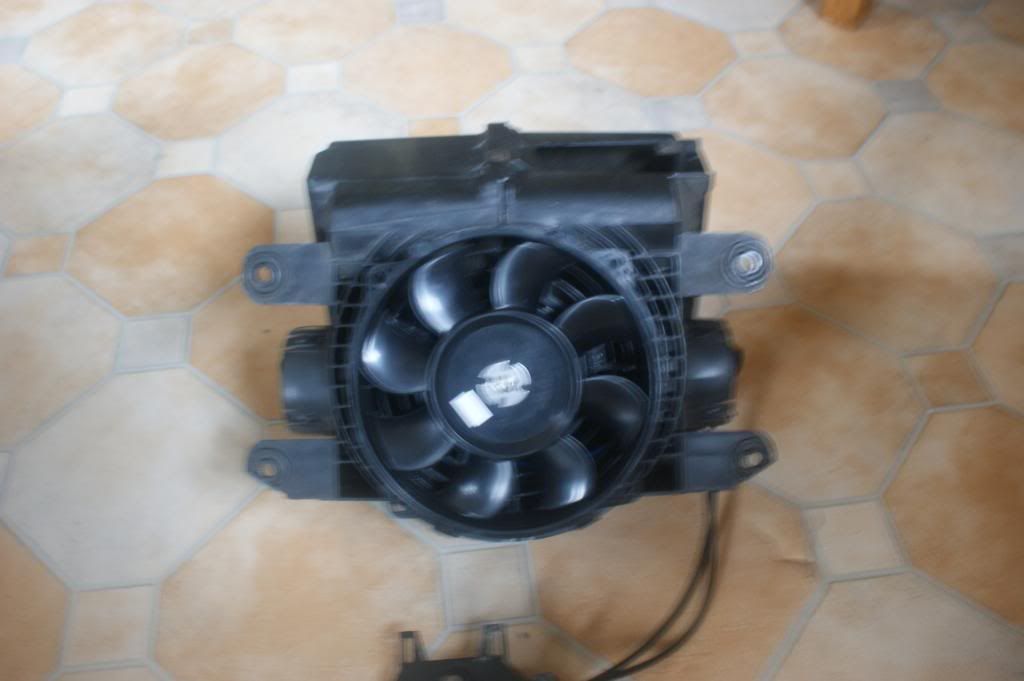
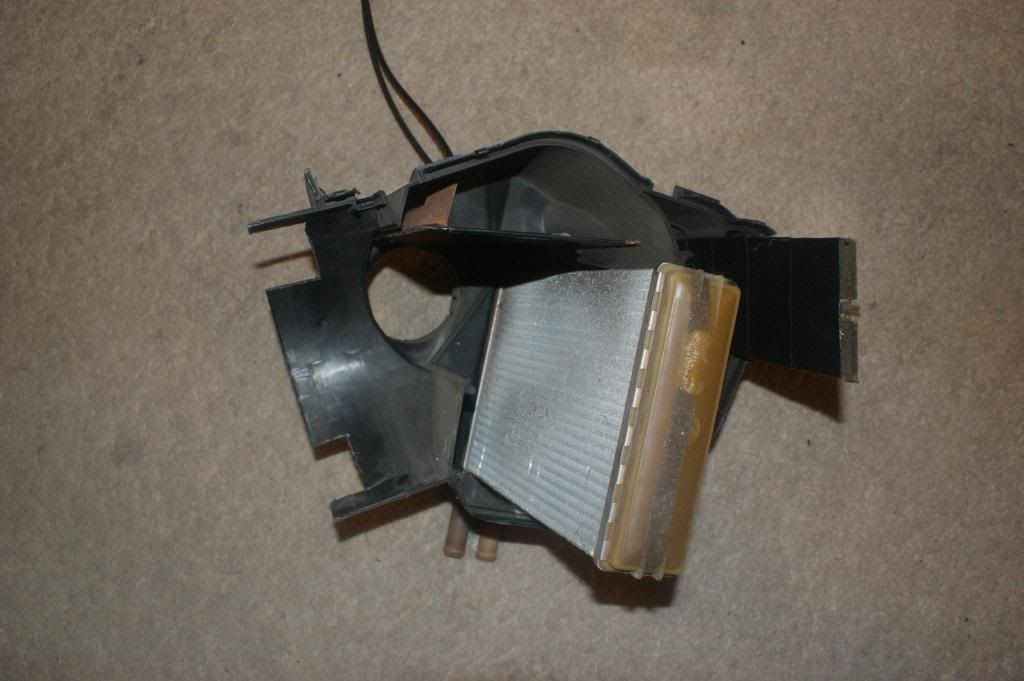
The finished product ready to go in the car.
The Duct tape around the fan shroud has two main purposes. The first is to keep that part of the box together as the original metal clips were binned with the original motor mount. The second is to seal the fan shroud as parts of it had to be cut out to allow the fan to fit in.
The fan wiring comes out of the original resistor hole and that has also been sealed with duct tape.
All the sealing is to try and get the system as efficient as possible, anything should be better than the current setup of a broken motor and barely any heat.
I have checked the fit using the dimensions Martin provided and by using the current heater box in the car as a reference to get the location for the control box.
I'm looking to improve the reliability of the heater system and the power of it. The fan I am using is designed for the radiator so will be able to stand up to whatever the elements can throw at it.
Will be fitting it up tomorrow and testing it all so will post up a video of it all working, provided there aren't any teething problems. Worked fine on the bench but I haven't tried the wiring with the relays and the switch so will see how it goes.
Let me know what you think
Sorry about being mysterious on this one but wanted to iron out the kinks before I showed you guys.


As you all know this is the profile of a std heater box


I set about cutting the supports for the original BEHR motor to fit in the new motor.


Comparison of the new and old motors and fan blades.
I got lucky that the original fan shroud is 7 inches which allowed me to get a 7 inch radiator fan to fit in there.


The new fan fitted into the heater box, riveted to one half of the heater box to secure it in place.

The plates from the internals of the heater box. I scraped off the old foam, it was coming off anyway, and I wrapped them in duct tape.


Plates fitted with the replacement matrix, Big thanks to Martin at Caprigear for getting that out so quick.

The wiring for the fan. I'm going to use the original switch to run the fan but I am using two relays to ensure I don't burn out the capri wiring. One relay is running a straight 12v direct from the battery while the other is using a 5 ohm resistor to sort out the slow speed option.


The finished product ready to go in the car.
The Duct tape around the fan shroud has two main purposes. The first is to keep that part of the box together as the original metal clips were binned with the original motor mount. The second is to seal the fan shroud as parts of it had to be cut out to allow the fan to fit in.
The fan wiring comes out of the original resistor hole and that has also been sealed with duct tape.
All the sealing is to try and get the system as efficient as possible, anything should be better than the current setup of a broken motor and barely any heat.
I have checked the fit using the dimensions Martin provided and by using the current heater box in the car as a reference to get the location for the control box.
I'm looking to improve the reliability of the heater system and the power of it. The fan I am using is designed for the radiator so will be able to stand up to whatever the elements can throw at it.
Will be fitting it up tomorrow and testing it all so will post up a video of it all working, provided there aren't any teething problems. Worked fine on the bench but I haven't tried the wiring with the relays and the switch so will see how it goes.
Let me know what you think
-
Ghia15
- Donator
- Posts: 2585
- Joined: Wed Jul 30, 2008 10:14 pm
- Car(s): 1981 3.0 Ghia (Restoration Project), 1982 2.0's (Long term project), 1993 BMW E34 520i, 1999 Volvo V70 (Sold to the Parents)
- Location: Reading
Re: Fan/Heater assembly
Just bench tested the system.
Works on both the low and high speed settings. Just need to get the relays wired up to the original switch in the car and an earth and the main power from the battery and all will be golden.
The amount of air coming out on high speed is awesome, so much better than the original motors.
Will get a vid of it working in the car tomorrow once it's all fitted.
-
ian_s
- Donator
- Posts: 110
- Joined: Thu Feb 28, 2013 9:18 am
- Car(s): Ford Capri 1.6GL (restoration project)
Ford Capri 1.6 Laser (2000-2004)
Lexus gs300 daily driver - Location: Coventry
Re: Fan/Heater assembly
Nice upgrade. Discreet yet effective 
 One day she will be back in that field!!
-
Ghia15
- Donator
- Posts: 2585
- Joined: Wed Jul 30, 2008 10:14 pm
- Car(s): 1981 3.0 Ghia (Restoration Project), 1982 2.0's (Long term project), 1993 BMW E34 520i, 1999 Volvo V70 (Sold to the Parents)
- Location: Reading
Re: Fan/Heater assembly
Right, I pulled my finger out and got cracking putting the new heater box in.
Took about 4 hours but it works perfectly.
I used the original fans 12v positive wire to go to the middle pin of the dash switch. I then used the two settings to power the relays and earthed the relays to the bolt on the metal dash frame that holds the downward support on.
All working and even on high power it is quiet and can barely be heard over the engine noise.
Puts out good air flow and was warm with the engine barely at the bottom of the gauge.
Looks like it was a good upgrade and the fan was only £10 more than an original bosch one so good value as well.
All the best guys
-
r2vdh
- Posts: 457
- Joined: Tue Nov 30, 2010 3:51 am
- Car(s): 2.8EFI Turbo special with LPG
- Location: Sussex
Re: Fan/Heater assembly
Thats brilliant.  I was looking into a very simular idea. beat me to it..
Only issue I can see is the occassional leaf that usually gets sucked in and blown out through the cold air vents.... This wont happen on yours... so over time your gunna have leafs trapped under the fan with no where to go....
Only issue I can see is the occassional leaf that usually gets sucked in and blown out through the cold air vents.... This wont happen on yours... so over time your gunna have leafs trapped under the fan with no where to go....
-
Ghia15
- Donator
- Posts: 2585
- Joined: Wed Jul 30, 2008 10:14 pm
- Car(s): 1981 3.0 Ghia (Restoration Project), 1982 2.0's (Long term project), 1993 BMW E34 520i, 1999 Volvo V70 (Sold to the Parents)
- Location: Reading
Re: Fan/Heater assembly
Not been a problem so far.
There have been a few leaves but I just turn it up to high and it chews them up and spits them out.
The fan blade sits about the same place as the old fan blade. Will see how it goes but so far so good.
There have been a few leaves but I just turn it up to high and it chews them up and spits them out.
The fan blade sits about the same place as the old fan blade. Will see how it goes but so far so good.
-
nigecapri

- Posts: 5795
- Joined: Mon Jul 28, 2008 6:31 am
- Car(s): Black 2.0S with supercharged bike carbs.
- Location: http://www.blacklabradorpuppies.co.uk/
- Contact:
Re: Fan/Heater assembly
Nice upgrade there Ghia. Nothing like a clear screen & toasty toes on a winter's morn.
What's the next project ? ?
What's the next project ? ?
-
Ghia15
- Donator
- Posts: 2585
- Joined: Wed Jul 30, 2008 10:14 pm
- Car(s): 1981 3.0 Ghia (Restoration Project), 1982 2.0's (Long term project), 1993 BMW E34 520i, 1999 Volvo V70 (Sold to the Parents)
- Location: Reading
Re: Fan/Heater assembly
Driving the car on the cold days is great.
Nice clear screen and the car gets really toasty.
Not sure what the next thing will be, probably just a bit of maintenance.
Nice clear screen and the car gets really toasty.
Not sure what the next thing will be, probably just a bit of maintenance.
-
r2vdh
- Posts: 457
- Joined: Tue Nov 30, 2010 3:51 am
- Car(s): 2.8EFI Turbo special with LPG
- Location: Sussex
Re: Fan/Heater assembly
Do you think the old heater resistor will be fine to run that new fan. Or does it require a different power supply to cope with the new current demand?? 
-
Ghia15
- Donator
- Posts: 2585
- Joined: Wed Jul 30, 2008 10:14 pm
- Car(s): 1981 3.0 Ghia (Restoration Project), 1982 2.0's (Long term project), 1993 BMW E34 520i, 1999 Volvo V70 (Sold to the Parents)
- Location: Reading
Re: Fan/Heater assembly
Best to change it.
The resistor I used was a 15 Watt resistor to be able to cope with the current draw from the more powerful fan.
The wattage of the Resistor needs to be matched correctly with the power of the new fan to ensure the wires do not melt and catch fire.
Best to do all the calculations correctly as if done improperly it could cause havoc with the original wiring.
As you will see from my wiring pic I used a separate relay for both low and high speed, the only difference was low speed had the resistor in series between the relay and the motor.
One of the guys on here was able to help me with the resistance calculations as I was a little rusty on them..
All the best.
-
ChrisGoodwin0603
- Posts: 19
- Joined: Sun Jun 23, 2013 6:25 pm
- Car(s): Ford Capri 2.0L
Re: Fan/Heater assembly
Been looking to do something like this with mine. Don't fancy sticking my head out the window 
-
Ghia15
- Donator
- Posts: 2585
- Joined: Wed Jul 30, 2008 10:14 pm
- Car(s): 1981 3.0 Ghia (Restoration Project), 1982 2.0's (Long term project), 1993 BMW E34 520i, 1999 Volvo V70 (Sold to the Parents)
- Location: Reading
Re: Fan/Heater assembly
It has been a very worth while upgrade,
When the windscreen is fogged up I can clear it fairly quickly, not modern car quick but good for a capri, without using a cloth or sponge.
Also stays clear and the car gets nice an toasty.
It is even better then the heater and fan in my dads 1999 4X4.
When the windscreen is fogged up I can clear it fairly quickly, not modern car quick but good for a capri, without using a cloth or sponge.
Also stays clear and the car gets nice an toasty.
It is even better then the heater and fan in my dads 1999 4X4.
Re: Fan/Heater assembly
Hi, any chance of a link to where you bought the fan please?? needing to fix up my behr and may try to copy urs it sounds great and will stop the missus whining about "the poxy old heater" i just tell her it'll be colder if she walks. 
Re: Fan/Heater assembly
Looks like a great mod- neat as well.
Re: Fan/Heater assembly
Hi,
Just like to resurrect this post please.
My son's heater motor just burnt to a crisp - he didn't know what the smell was so just kept driving thinking he'd outrun it...ummm.
This looks like a good conversion/upgrade.
Any chance of a proper wiring diagram? even a hand drawn one?
Many thanks
paul
Just like to resurrect this post please.
My son's heater motor just burnt to a crisp - he didn't know what the smell was so just kept driving thinking he'd outrun it...ummm.
This looks like a good conversion/upgrade.
Any chance of a proper wiring diagram? even a hand drawn one?
Many thanks
paul