
My ebay engine
-
Craigorypeck

- Posts: 2338
- Joined: Sat Feb 21, 2009 1:45 pm
- Car(s): Mk III Capri- 2.0 YB cossie lump with eaton blower on bike carbs. Problem... its 4000 miles away.
MK1 resto- 2.3 Turbo or Charger, both probably
Chevy Cobalt - Location: Canada
-
Peter-S

- Donator

- Posts: 7456
- Joined: Mon Jul 28, 2008 7:57 am
- Car(s): 1985 Capri 2.0
1983 Capri 2.8i - Location: Kent
- Contact:
Re: My ebay engine
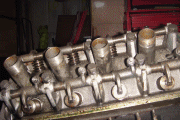
Bit more cleaning up on the head.
Valves about done and waiting

Cleaned up the manifold faces and added a little insert colour courtesy of some bbq paint in the cupboard

Cleaned up the rocker gasket mating face

Removed the cam seal

and fitted a Ford replacement

Also cleaned up the cam belt tensioner

Valves about done and waiting
Cleaned up the manifold faces and added a little insert colour courtesy of some bbq paint in the cupboard
Cleaned up the rocker gasket mating face
Removed the cam seal
and fitted a Ford replacement
Also cleaned up the cam belt tensioner
-
STOCK...tm

- Posts: 816
- Joined: Wed Aug 20, 2008 8:07 pm
- Car(s): Nothing special as a daily driver.. nothing for the weekend.... but a HEMI V8 in the garage getting some attention :)
Re: My ebay engine
i have seen the 'punch' mark on a few heads now...on ones that could possibly be unleaded due to age...... my theory is that if an unleaded head is recon properly then all mating faces will be skimmed for trueness.... the unleaded stamp can be really faint meaning it will be machined away with the lightest pass of a surface grinder.... maybe these heads had the punch mark to 'mark' them??
-
Peter-S
- Donator
- Posts: 7456
- Joined: Mon Jul 28, 2008 7:57 am
- Car(s): 1985 Capri 2.0
1983 Capri 2.8i - Location: Kent
- Contact:
Re: My ebay engine
A bit more cosmetic progress.
Lifting brackets were suitably cruddy

but cleaned up reasonably well

Cleaned the sump bolts and gave them a coat of lacquer. Probably won't last but ...

Started to clean the washers too

Rocker box wasn't too impressive

Took the wire brush and drill to it then gave it some rust treatment

Won't win any prizes but hasn't come up too badly

Lifting brackets were suitably cruddy
but cleaned up reasonably well
Cleaned the sump bolts and gave them a coat of lacquer. Probably won't last but ...
Started to clean the washers too
Rocker box wasn't too impressive
Took the wire brush and drill to it then gave it some rust treatment
Won't win any prizes but hasn't come up too badly
-
jimmyted

- Posts: 582
- Joined: Wed Jun 09, 2010 6:35 pm
- Car(s): ford capri 1.6L - now 2.0L
- Location: leeds
Re: My ebay engine
This thread is brilliant Peter! I've been keeping an eye on it and can't believe the before - after difference. What tools/chemicals have you been using to clean everything up? I've heard those wire brush drill attachment jobbies are pretty good..
-
Peter-S
- Donator
- Posts: 7456
- Joined: Mon Jul 28, 2008 7:57 am
- Car(s): 1985 Capri 2.0
1983 Capri 2.8i - Location: Kent
- Contact:
Re: My ebay engine
Thanks Jim, kind of you to say sojimmyted wrote:This thread is brilliant Peter! I've been keeping an eye on it and can't believe the before - after difference. What tools/chemicals have you been using to clean everything up? I've heard those wire brush drill attachment jobbies are pretty good..
The rust treatment is Metal Ready which I get from Frost. Spray it on, leave a while then wash with clean water to neutralize. Seems pretty good.
Tools are all fairly ordinary. A cordless drill with various sanding discs and wire wheels, the most effective of which was in a set from a £1 store!, wire wool and wet n' dry paper The porting has been done with different shape grinding stones in the drill and then I bought a set of burrs from ebay. I also have some smaller stones and brushes that came with a dremel type drill.
A small palm sander has proved quite useful in cleaning up the manifold mating faces.
Grease and other cleaning has been done with gunk, thinners and WD40.
The fuel pump I've just started cleaning with aluminium oxide paper and Brasso wadding


Painting is mostly U-Pol and Halfords stuff. Coated the rocker in petrol resistant lacquer this evening but progress stops for a week off now

-
jimmyted
- Posts: 582
- Joined: Wed Jun 09, 2010 6:35 pm
- Car(s): ford capri 1.6L - now 2.0L
- Location: leeds
Re: My ebay engine
thanks for the info Peter. Good luck with getting it up and running before CRaP! Are you keeping the standard cam or going for something a bit livelier?
-
rich_jc

- Donator
- Posts: 5091
- Joined: Mon Jul 28, 2008 5:27 pm
- Car(s): Signal Orange 1980 (W) 2.0 GL ("s" spec) 5 speed
- Location: Bury St. Edmunds, Suffolk
- Contact:
Re: My ebay engine
Really good read there Peter. I've got an old block I want to re-hone and get up and running, so nice to see in picture form what is involved.
I will no doubt be pestering you at Crap about it.
Rich
I will no doubt be pestering you at Crap about it.
Rich
-
Peter-S
- Donator
- Posts: 7456
- Joined: Mon Jul 28, 2008 7:57 am
- Car(s): 1985 Capri 2.0
1983 Capri 2.8i - Location: Kent
- Contact:
Re: My ebay engine
I'm running a piper 270 at the moment Jim and I'll be putting that in the head that I've just ported.jimmyted wrote:thanks for the info Peter. Good luck with getting it up and running before CRaP! Are you keeping the standard cam or going for something a bit livelier?
Thanks Rich. Hopefully I'll be able to report that it was all worth the effortReally good read there Peter. I've got an old block I want to re-hone and get up and running, so nice to see in picture form what is involved.
I will no doubt be pestering you at Crap about it.
Rich
A holiday and a spot of 'man flu' have kept me out of the garage but I'#ve cleaned up a couple more bits and freshened up the spare manifold.


-
Peter-S
- Donator
- Posts: 7456
- Joined: Mon Jul 28, 2008 7:57 am
- Car(s): 1985 Capri 2.0
1983 Capri 2.8i - Location: Kent
- Contact:
Re: My ebay engine
Head's cleaned but can't put the valves in as I need the cam that's in the car now

Dug out a spare alternator

and freshened it up a little

Then I remembered I had a shiny dipstick tube from Stock but was worried it was too short compared to the one I'd removed

but the dipstick in the car now is a good bit shorter than the one on this engine. Don't know what that's all about but I'll just use the shorter stick as that is the right length ro the shiny tube

Then fitted a brand new push rod for the fuel pump

and this is where its at

Just need to find time to actually swap the engines now
Dug out a spare alternator
and freshened it up a little
Then I remembered I had a shiny dipstick tube from Stock but was worried it was too short compared to the one I'd removed
but the dipstick in the car now is a good bit shorter than the one on this engine. Don't know what that's all about but I'll just use the shorter stick as that is the right length ro the shiny tube
Then fitted a brand new push rod for the fuel pump
and this is where its at
Just need to find time to actually swap the engines now
-
STOCK...tm
- Posts: 816
- Joined: Wed Aug 20, 2008 8:07 pm
- Car(s): Nothing special as a daily driver.. nothing for the weekend.... but a HEMI V8 in the garage getting some attention :)
-
Peter-S
- Donator
- Posts: 7456
- Joined: Mon Jul 28, 2008 7:57 am
- Car(s): 1985 Capri 2.0
1983 Capri 2.8i - Location: Kent
- Contact:
Re: My ebay engine
Well, this is the 'big' weekend. T'other half seems keen for this to be completed so she phoned round to find an engine hoist for hire to make sure! Picked it up first thing this morning.
So, car nosed into garage

Battery out and on charge, just in case!

Strut brace, rad etc out

All bolts removed and lifting commenced

Didn't want to remove the bonnet so a broom was wedged in to give a bigger opening but still a tight fit

and then it was out

Removed the clutch and flywheel to reveal a nice oil leak

Bit worried about the flywheel at first as it didn't look too good

But its a lightened item that I want to keep

Cleaned it up and gave it a going over with a fine wetstone and it seems fine with no crazing, just a bit of staining so put it on the rebuilt engine

As I need to strip the old head of the camshaft etc I thought I'd put just the bottom half in the car first then at least the hoist can go back

After a bit of cursing and a bruised nail it was all mated up

So I cleaned the dizzy ready to put back tomorrow

Hopefully the hardest part is done but took a good deal longer than Glyn and Phil's engine swap in a field last year.
So, car nosed into garage
Battery out and on charge, just in case!
Strut brace, rad etc out
All bolts removed and lifting commenced
Didn't want to remove the bonnet so a broom was wedged in to give a bigger opening but still a tight fit
and then it was out
Removed the clutch and flywheel to reveal a nice oil leak
Bit worried about the flywheel at first as it didn't look too good
But its a lightened item that I want to keep
Cleaned it up and gave it a going over with a fine wetstone and it seems fine with no crazing, just a bit of staining so put it on the rebuilt engine
As I need to strip the old head of the camshaft etc I thought I'd put just the bottom half in the car first then at least the hoist can go back
After a bit of cursing and a bruised nail it was all mated up
So I cleaned the dizzy ready to put back tomorrow
Hopefully the hardest part is done but took a good deal longer than Glyn and Phil's engine swap in a field last year.
-
Peter-S
- Donator
- Posts: 7456
- Joined: Mon Jul 28, 2008 7:57 am
- Car(s): 1985 Capri 2.0
1983 Capri 2.8i - Location: Kent
- Contact:
Re: My ebay engine
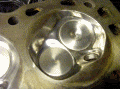
Head ready for stripping

Valves in the new head

springs and colletts fitted

Gasket in place

Then it ball slowed down. Seemed to take an age to swap all the manold studs, clean stuff up, set the valve gaps etc so didn't get to start it today Getting there though

Valves in the new head
springs and colletts fitted
Gasket in place
Then it ball slowed down. Seemed to take an age to swap all the manold studs, clean stuff up, set the valve gaps etc so didn't get to start it today
-
Peter-S
- Donator
- Posts: 7456
- Joined: Mon Jul 28, 2008 7:57 am
- Car(s): 1985 Capri 2.0
1983 Capri 2.8i - Location: Kent
- Contact:
Re: My ebay engine
Took the hoist back this morning and chatting to the guy in the shop it turned out he was a big Capri fan and had owned several over the years including an RS3100 which he regrets selling!
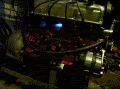
Back home this evening I got most of the engine back together than cranked the engine without plugs to make sure the oil was Flowing.

New rocker gasket

Then filled it with water and found that th ethermostat housing that I had polished up had a pin hole leak in it and was pissing water out the side
So I got the one off the engine that I had been using and started to clean the scale off the inside and that had a bloody hole too

I had to dig out my plumber's trug and found some of that epoxy chemical metal stuff that you can use on water tanks etc and I've reinforced the housing from the inside. Should be OK but I'll let it cure over night.
I wante dto know if the engine ran though so jumped in the car and cranked it over - nothing!
Cranked it over again and ..... she lives
It was a bit chuggy and wouldn't really idle but its only set at staic timing at the moment but sounded OK when revved. I'll change the stat housing tomorrow and then I can run it up to temp and put the strobe on it.

Back home this evening I got most of the engine back together than cranked the engine without plugs to make sure the oil was Flowing.
New rocker gasket
Then filled it with water and found that th ethermostat housing that I had polished up had a pin hole leak in it and was pissing water out the side
So I got the one off the engine that I had been using and started to clean the scale off the inside and that had a bloody hole too
I had to dig out my plumber's trug and found some of that epoxy chemical metal stuff that you can use on water tanks etc and I've reinforced the housing from the inside. Should be OK but I'll let it cure over night.
I wante dto know if the engine ran though so jumped in the car and cranked it over - nothing!
Cranked it over again and ..... she lives
It was a bit chuggy and wouldn't really idle but its only set at staic timing at the moment but sounded OK when revved. I'll change the stat housing tomorrow and then I can run it up to temp and put the strobe on it.
Last edited by Peter-S on Tue May 10, 2011 8:47 am, edited 1 time in total.
-
Beakster

- Donator
- Posts: 3980
- Joined: Sun Jul 27, 2008 10:16 pm
- Car(s): 1983 Ford Capri 2.9 24V Cosworth Injection
- Location: Toronto, Canada
- Contact:
Re: My ebay engine
Great work Peter, looking really nice. If the chemical metal doesn't hold you could always bling it up with one of these: http://www.burtonpower.com/ft1072b.html

-
Peter-S
- Donator
- Posts: 7456
- Joined: Mon Jul 28, 2008 7:57 am
- Car(s): 1985 Capri 2.0
1983 Capri 2.8i - Location: Kent
- Contact:
Re: My ebay engine
Thanks Chris.Beakster wrote:Great work Peter, looking really nice.
Had reason to recall your 2.o woes yesterday. Running it up to temp I started to get a squeal. Took the fan belt off in case it was fan or alternator related but the squeal was still there coming from the front of the cam. Being a twat I'd used the wrong size screw on the oil bar and pinched the bearing. Fortunately I got away without the melting pot that you had.
Changed the bearing and ran it up to temp this evening and something else started knocking and clonking. Thought it might be a tappet coming loose and took the rocker cover off but all was OK. Then noticed the fan belt was loose. I hadn't tightened the four bolts that hold the fan pulley on and it was wobbling all over the place
Anyway, got there eventually, set the timing at 14 degrees tweaked the carb a little and went for a spin. It's going to need some more tinkering and probably a proper tune but it sure feels like it could be quite entertaing
-
jimmyted
- Posts: 582
- Joined: Wed Jun 09, 2010 6:35 pm
- Car(s): ford capri 1.6L - now 2.0L
- Location: leeds
Re: My ebay engine
Bloodyhell Peter! I've only been off the forum for a few weeks, and you've almost got the job done! Cracking effort. Makes my 6 - 7 month slog doing pretty much the same thing look a bit daft! I got one of those dipstick tubes off Stock as well, and I ended up using the dipstick from the original 1.6 engine as the 2.0 one was too long.