Page 2 of 2
Re: Parasitic draw
Posted: Wed Feb 17, 2021 9:49 pm
by Mr B
Bug wrote: ↑Wed Feb 17, 2021 8:19 am
Hold up!
Think there's a misunderstanding occurring here?
Yes, the lenses are held on with small screws and seals which I always thought were to keep the moisture out? Doing them up too tight may indeed crack the lenses.
However, I think the question may be more to do with the two big fat screws that hold the light assembly in place, from inside the boot? If you do these up too tight, it cracks the back plate. As this carries the common earth for all the lights, back through the mounting screws to the bodywork, then a crack can cause all sorts of odd lighting issues. I've even seen it cause a problem with front sidelights! That one took a a while to trace.
Hi Bug,
Yes it's the 2 large screws that hold each rear cluster in place that have had bolts put in them.
Wayne
Re: Parasitic draw
Posted: Thu Feb 18, 2021 8:38 am
by Bug
Mr B wrote: ↑Wed Feb 17, 2021 9:49 pm
Bug wrote: ↑Wed Feb 17, 2021 8:19 am
Hold up!
Think there's a misunderstanding occurring here?
Yes, the lenses are held on with small screws and seals which I always thought were to keep the moisture out? Doing them up too tight may indeed crack the lenses.
However, I think the question may be more to do with the two big fat screws that hold the light assembly in place, from inside the boot? If you do these up too tight, it cracks the back plate. As this carries the common earth for all the lights, back through the mounting screws to the bodywork, then a crack can cause all sorts of odd lighting issues. I've even seen it cause a problem with front sidelights! That one took a a while to trace.
Hi Bug,
Yes it's the 2 large screws that hold each rear cluster in place that have had bolts put in them.
Wayne
In that case, sorry I don't have photos, but if you take them off it is easy to see how the screws (bolts in your case) can pull the fitting too tight, usually resulting in cracks either side of the threaded screw holes. The light units earth through these screws, so make sure all is intact and that the fittings are all clean.
Basically, do them up finger tight, then slowly add a turn to each screw, while trying to move the unit by hand. As soon as they won't move, stop turning.
Re: Parasitic draw
Posted: Sun Feb 28, 2021 12:06 am
by Mr B
Bug wrote: ↑Thu Feb 18, 2021 8:38 am
Mr B wrote: ↑Wed Feb 17, 2021 9:49 pm
Bug wrote: ↑Wed Feb 17, 2021 8:19 am
Hold up!
Think there's a misunderstanding occurring here?
Yes, the lenses are held on with small screws and seals which I always thought were to keep the moisture out? Doing them up too tight may indeed crack the lenses.
However, I think the question may be more to do with the two big fat screws that hold the light assembly in place, from inside the boot? If you do these up too tight, it cracks the back plate. As this carries the common earth for all the lights, back through the mounting screws to the bodywork, then a crack can cause all sorts of odd lighting issues. I've even seen it cause a problem with front sidelights! That one took a a while to trace.
Hi Bug,
Yes it's the 2 large screws that hold each rear cluster in place that have had bolts put in them.
Wayne
In that case, sorry I don't have photos, but if you take them off it is easy to see how the screws (bolts in your case) can pull the fitting too tight, usually resulting in cracks either side of the threaded screw holes. The light units earth through these screws, so make sure all is intact and that the fittings are all clean.
Basically, do them up finger tight, then slowly add a turn to each screw, while trying to move the unit by hand. As soon as they won't move, stop turning.
Hey Bug,
You was right, the damage is easy to see - off side cluster is toast, someone got a bit over excited when doing up the fixing bolts, also discovered that someone had cut the wire to the number plate lights and instead spliced into the rear side light circuit to get power to them, the actual number plate feed wire was still live and working so god knows why they did that!
The Joy's of old cars eh?
Thanks for your help mate
Wayne
Re: Parasitic draw
Posted: Mon Mar 01, 2021 8:46 am
by Bug
No worries.
Glad it helped, and more importantly it was nice to get feedback.

Re: Parasitic draw
Posted: Tue Mar 02, 2021 1:19 am
by Major_Tom
Bug wrote: ↑Wed Feb 17, 2021 8:19 am
Hold up!
Think there's a misunderstanding occurring here?
Yes, the lenses are held on with small screws and seals which I always thought were to keep the moisture out? Doing them up too tight may indeed crack the lenses.
However, I think the question may be more to do with the two big fat screws that hold the light assembly in place, from inside the boot? If you do these up too tight, it cracks the back plate. As this carries the common earth for all the lights, back through the mounting screws to the bodywork, then a crack can cause all sorts of odd lighting issues. I've even seen it cause a problem with front sidelights! That one took a a while to trace.
That's interesting - one of my sidelights comes on when I brake.
Re: Parasitic draw
Posted: Tue Mar 02, 2021 8:21 am
by Bug
Major_Tom wrote: ↑Tue Mar 02, 2021 1:19 am
Bug wrote: ↑Wed Feb 17, 2021 8:19 am
Hold up!
Think there's a misunderstanding occurring here?
Yes, the lenses are held on with small screws and seals which I always thought were to keep the moisture out? Doing them up too tight may indeed crack the lenses.
However, I think the question may be more to do with the two big fat screws that hold the light assembly in place, from inside the boot? If you do these up too tight, it cracks the back plate. As this carries the common earth for all the lights, back through the mounting screws to the bodywork, then a crack can cause all sorts of odd lighting issues. I've even seen it cause a problem with front sidelights! That one took a a while to trace.
That's interesting - one of my sidelights comes on when I brake.
I don't believe you Tom! When did you ever brake?

Re: Parasitic draw
Posted: Tue Mar 02, 2021 7:21 pm
by Mc Tool
When I got my crapi I couldnt find the wires on tother end of fog light switch ,we have fog lights on the front here so thats the end I went for , and then there was confusion at the rear because I had spare wires and wires to xtra brake lights. Somebody has disconnected the rear fogs and hooked them up to the brake lights so I got 4 brake lights (Mavis

Cleaver still managed to run up the arse of me) , and a spare switch on the dash which is now for the fuel pump .......,the idea being that if someone half inches crapi , not knowing about the switch, the car will run for a bit then crap out ,and most car thieves wont hang about in a stolen motor thats blocking traffic and legs it .......I get my car back
Re: Parasitic draw
Posted: Sun Mar 07, 2021 11:13 am
by Mr B
Morning all,
So I replaced the offside rear light cluster as it was suffering from the cracking that Bug mentioned, however as a result of replacing it that "its always had it dimly glowing ignition light" is now much worse than what it was which I cannot understand as the donor cluster is in perfect condition, before I put it on the car I cleaned up all the connections and it is working perfectly I.e. all the lights are doing what they should be.
Any thoughts guys?
Wayne
Re: Parasitic draw
Posted: Sun Mar 07, 2021 11:31 am
by stevemarl
It`s probably nothing to worry about. It`s a 40 year old car with 40 year old wiring. There will be numerous joins, connnectors, terminals, between the Alt, battery, ignition light, each of which will have deteriorated slightly and introduced tiny resistance/ voltage drops into the system: as long as the light glows brightly when engine off and decreases significantly when on , and the alternator has correct output, it`s not a cause for concern. (Also he more electrics you have on, the brighter it will glow, this is normal. Maybe now your back lights are working...?)
Re: Parasitic draw
Posted: Mon Mar 08, 2021 8:40 am
by Bug
I assume you gave the nearside cluster a good check over and clean at the same time?
Re: Parasitic draw
Posted: Mon Mar 08, 2021 9:47 pm
by Mr B
Bug wrote: ↑Mon Mar 08, 2021 8:40 am
I assume you gave the nearside cluster a good check over and clean at the same time?
I wont lie, I did check the cluster on the near side for cracking but neglected to clean up the connections

Just took her out about 5 minutes ago and it would seem that heater blower has quite an effect on the ignition light too, so it's brake lights and the heater blower that are the main culprits but as Steve rightly says the wiring/connections are old so I guess its either live it or get busy cleaning up every possible connection ...
Wayne
Re: Parasitic draw
Posted: Tue Mar 09, 2021 10:35 am
by Bug
Mr B wrote: ↑Mon Mar 08, 2021 9:47 pm
Bug wrote: ↑Mon Mar 08, 2021 8:40 am
I assume you gave the nearside cluster a good check over and clean at the same time?
I wont lie, I did check the cluster on the near side for cracking but neglected to clean up the connections
Just took her out about 5 minutes ago and it would seem that heater blower has quite an effect on the ignition light too, so it's brake lights and the heater blower that are the main culprits but as Steve rightly says the wiring/connections are old so I guess its either live it or get busy cleaning up every possible connection ...
Wayne
What type alternator is it? I think some had an easily removable diode pack with the brushes fitted in. Could be worth whipping that out and checking the brush wear. Might be that a new pack sorts it?
Re: Parasitic draw
Posted: Tue Mar 09, 2021 11:58 am
by stevemarl
Bug wrote: ↑Tue Mar 09, 2021 10:35 am
I think some had an easily removable diode pack with the brushes fitted in.
The Bosch is most common and very easy to swap. It`s actually the regulator and brushes, the diode pack is internal - but as you say it IS easily removed, you can even do it in situ.
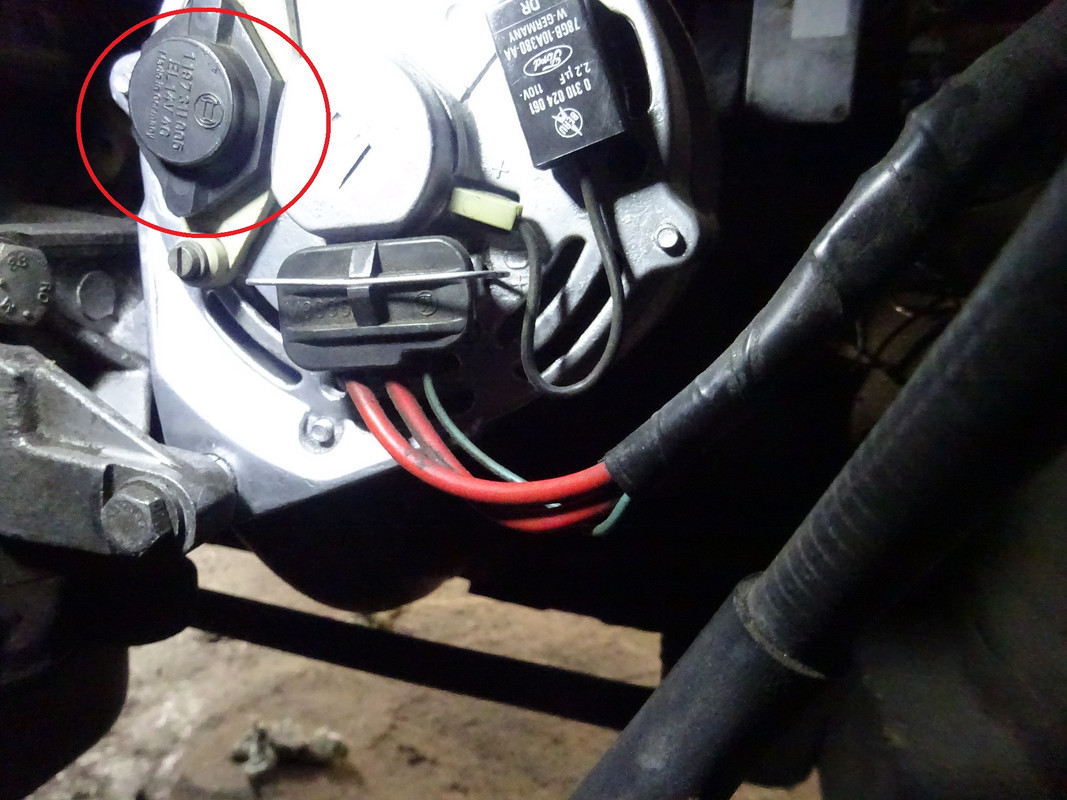
The thing to remember is that the light is just an indicator that the Alt is charging. It basically compares the Batt voltage with the Alt voltage. If engine`s stopped you have 12 on batt, 0 on alt = 12v across bulb, bulb lights fully. Engine running, in
theory, 13.8v on alt and 13.8v on batt = 0v across bulb. But, If there are any tiny resistances twixt alt and batt you will have a difference in voltage: 14v on alt, 13.2v on batt = 0.8v across bulb - which will glow feintly. Put more load on system 14v on alt, 13.0v on batt = 1.0v and bulb glows more brightly. What I`m saying is, as long as you`re getting a decent charging V on batt, it`s not worth worrying?
If anything, I`d try cleaning up the earth straps, lead from batt to alt, multipin into alt etc, etc -
Re: Parasitic draw
Posted: Tue Mar 09, 2021 2:53 pm
by Bug
stevemarl wrote: ↑Tue Mar 09, 2021 11:58 am
Bug wrote: ↑Tue Mar 09, 2021 10:35 am
I think some had an easily removable diode pack with the brushes fitted in.
The Bosch is most common and very easy to swap. It`s actually the regulator and brushes, the diode pack is internal - but as you say it IS easily removed, you can even do it in situ.
Ah ok, that's cleared that up.
Electrickery's not my strong point.
Re: Parasitic draw
Posted: Tue Mar 09, 2021 11:19 pm
by Mr B
Hi guys,
The alternator is a brand new 65amp jobbie, today I took the near side cluster out again and cleaned up all the connections - can't get inside the spade connectors to clean them though so just the actual cluster connections were cleaned/gently sanded with a nail file.
Tomorrow the plan is to clean up all the earth straps and look more closely at the wiring from the alternator.....
As ever thanks for your help gents
Wayne
Re: Parasitic draw
Posted: Wed Mar 10, 2021 3:34 am
by Mc Tool
Wayne , I have often thought ... well sometimes ....ok only once .....about the convoluted path from the alt to the battery on the ole Capri ....via the dash charge amp gauge , and there has to be a shunt in there somewhere as theres no way theres 60 amps going thru the printed circuit and gauge . A lot of potential for an accumulation of high resistance joints which , as others have said will cause a bit of volt drop . My amp gauge no longer works ......if I turn ign to on with motor not running and then turn everything on the needle stays right in the middle. If you can get at the relevant bits a volt drop test is probly the easiest way to diagnose......or hopefully there is a common failure point some clever bugger ( not Jason

) may lead you right to.

Re: Parasitic draw
Posted: Thu Mar 11, 2021 1:27 am
by Mr B
Mc Tool wrote: ↑Wed Mar 10, 2021 3:34 am
Wayne , I have often thought ... well sometimes ....ok only once .....about the convoluted path from the alt to the battery on the ole Capri ....via the dash charge amp gauge , and there has to be a shunt in there somewhere as theres no way theres 60 amps going thru the printed circuit and gauge . A lot of potential for an accumulation of high resistance joints which , as others have said will cause a bit of volt drop . My amp gauge no longer works ......if I turn ign to on with motor not running and then turn everything on the needle stays right in the middle. If you can get at the relevant bits a volt drop test is probly the easiest way to diagnose......or hopefully there is a common failure point some clever bugger ( not Jason
) may lead you right to.
Funny you should say, the amp gauge doesn't work on mine either......
Re: Parasitic draw
Posted: Thu Mar 11, 2021 9:40 am
by stevemarl
Mc Tool wrote: ↑Wed Mar 10, 2021 3:34 am
I have often thought ... well sometimes ....ok only once .....about the convoluted path from the alt to the battery on the ole Capri ....via the dash charge amp gauge , and there has to be a shunt in there somewhere as theres no way theres 60 amps going thru the printed circuit and gauge
I`ve often wondered about that myself: there must BE a shunt - but where the hell is it? Unless it just uses the battery lead itself as the shunt somehow? Suppose it must be as it`s directional, either in or out of battery, so must be between batt and alt? Somehow?
Re: Parasitic draw
Posted: Thu Mar 11, 2021 5:31 pm
by Mc Tool
Well I couldnt see anything that looked like a shunt, it might turn out to be a bit of wire like the ballast resistor
.
 Cleaver still managed to run up the arse of me) , and a spare switch on the dash which is now for the fuel pump .......,the idea being that if someone half inches crapi , not knowing about the switch, the car will run for a bit then crap out ,and most car thieves wont hang about in a stolen motor thats blocking traffic and legs it .......I get my car back
 ) may lead you right to.