Page 1 of 1
Handbrake adjustment
Posted: Mon Dec 02, 2019 2:35 pm
by Owent2005
Today has been a busy day!
While waiting for replies to my electric issues I thought I’d look at adjusting my handbrake cable.
I tried following the Haines manual direction however the description is pretty poor and pictures even worse.
The picture is showing what is fitted to the car, could anyone explain what I need to do to take the slack out of the cable.
Thanks,
Owen
Re: Handbrake adjustment
Posted: Mon Dec 02, 2019 2:40 pm
by D366Y
What's the actual problem with the handbrake?
I had a nightmare earlier this year and it ended up being because of the drum shoes in the rear brakes
Take a look here if it helps
viewtopic.php?f=13&t=52543&hilit=handbrake
Danny
Re: Handbrake adjustment
Posted: Mon Dec 02, 2019 2:49 pm
by Owent2005
Thanks for the info Danny,
The only issue is that the handbrake lever is quite high before having any effect. There’s a slack in the cable so thought I’d try and get rid of that before investigating further.
Owen
Re: Handbrake adjustment
Posted: Mon Dec 02, 2019 4:06 pm
by Andrew 2.8i
Hi Owen,
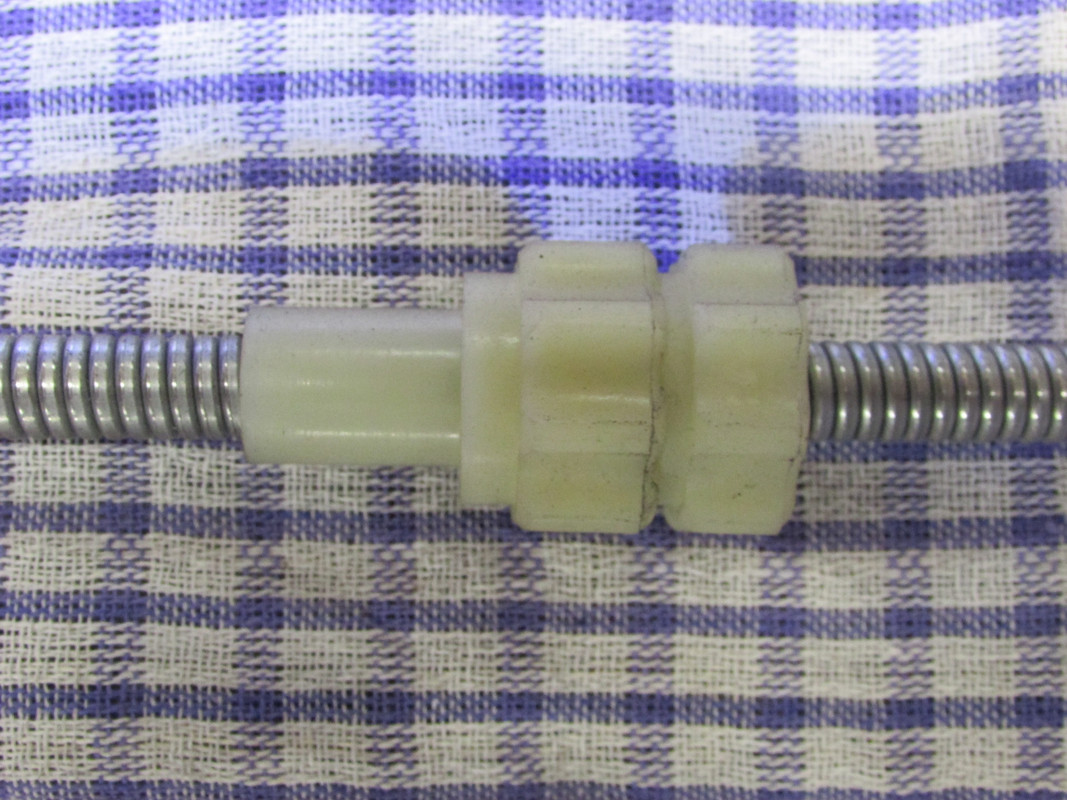
Your photo shows where the handbrake cable attaches to the rod. You need to follow the cable towards the front of the car and you'll see a bracket where the cable goes through. There you will find two knurled plastic knobs, loosen off the locking one, then you can turn the main knob to adjust the slack. Don't forget to re-tighten the locking knob afterwards.

Andrew.
Re: Handbrake adjustment
Posted: Mon Dec 02, 2019 4:49 pm
by Andrew 2.8i
This is what the adjustment knob looks like:
#
The locking knob is the one to the right in the photo.
Andrew.
Re: Handbrake adjustment
Posted: Mon Dec 02, 2019 9:18 pm
by Owent2005
Thanks Andrew, how far forward are the adjustment knobs?
Re: Handbrake adjustment
Posted: Mon Dec 02, 2019 9:44 pm
by Andrew 2.8i
Owent2005 wrote: ↑Mon Dec 02, 2019 9:18 pm
Thanks Andrew, how far forward are the adjustment knobs?
They are at the rear end of the transmission tunnel, about a foot from where the cable joins the handbrake rod.
Andrew.
Re: Handbrake adjustment
Posted: Mon Dec 02, 2019 10:03 pm
by Not_Anumber
It is very easy to adjust once you've found it. The outside of the cable itself is a coarse thread which the adjuster winds along to take up the slack.
Some would say it's always worth checking the adjusters on the brake drums first. To do that you would slacken them off (Haynes manual covers it) then apply the brakes and the handbrake a few times to make sure they are set correctly. Then move onto the adjuster on the cable itself.
Re: Handbrake adjustment
Posted: Tue Dec 03, 2019 11:31 am
by Bug
Not_Anumber wrote: ↑Mon Dec 02, 2019 10:03 pm
It is very easy to adjust once you've found it. The outside of the cable itself is a coarse thread which the adjuster winds along to take up the slack.
Some would say it's always worth checking the adjusters on the brake drums first. To do that you would slacken them off (Haynes manual covers it) then apply the brakes and the handbrake a few times to make sure they are set correctly. Then move onto the adjuster on the cable itself.
Agreed. this will give the best results by far.
The application of the handbrake is ideal...........if it till works that way. Sometimes they are so worn/corroded/seized that the best method is to tweak them a bit at a time with a screwdriver. (In fact I used this method every time as I then had a good idea of what was what under there)
Strip and clean the adjusters as necessary first. They should be able to ratchet smoothly.
Disconnect the rod from the lever behind the back-plate.
Take off the brake drum.
Then adjust the brake shoes.
If you very gently easy the shoe out a little (twist a screwdriver between the hub and the shoe) you should see/hear the adjuster click out on the ratchet. Go easy or it'll leap half a dozen notches! For every click of the adjuster, do a trial refit of the drum. When the drum is able to rotate with just a very slight sound of gentle rubbing, it is correctly set.
Note that the drum may be quite hard to fit on as there could be a lip on the shoe, so make sure it is fully on before you do the spin test.
Repeat for the other side.
Now you will, in all likelihood, find that the rod attachment no long lines up.
At this point, shimmy under the car and unwind the cable adjuster until you have enough slack to fit the pins back in.
This ensures you have no preload in the handbrake linkage.
Once this is all connected up, get back to the cable adjuster and take up all the slack.
The last bit really checks your suppleness! Keep tweaking the adjuster, then popping up to pull on the handbrake to see how many clicks you have on it.
NB. The initial pull on the handbrake may well just re-seat the adjuster in its bracket and leave you a bit of slack again.
So keep adjusting and checking until you have the desired number of clicks. I would recommend a maximum of three, with it needing a hard pull to get the third one.
You should also notice a better feel in the brake pedal as now the shoes are close to the drums you are not having to take up that slack before they bite.
Re: Handbrake adjustment
Posted: Tue Dec 03, 2019 4:00 pm
by stevemarl
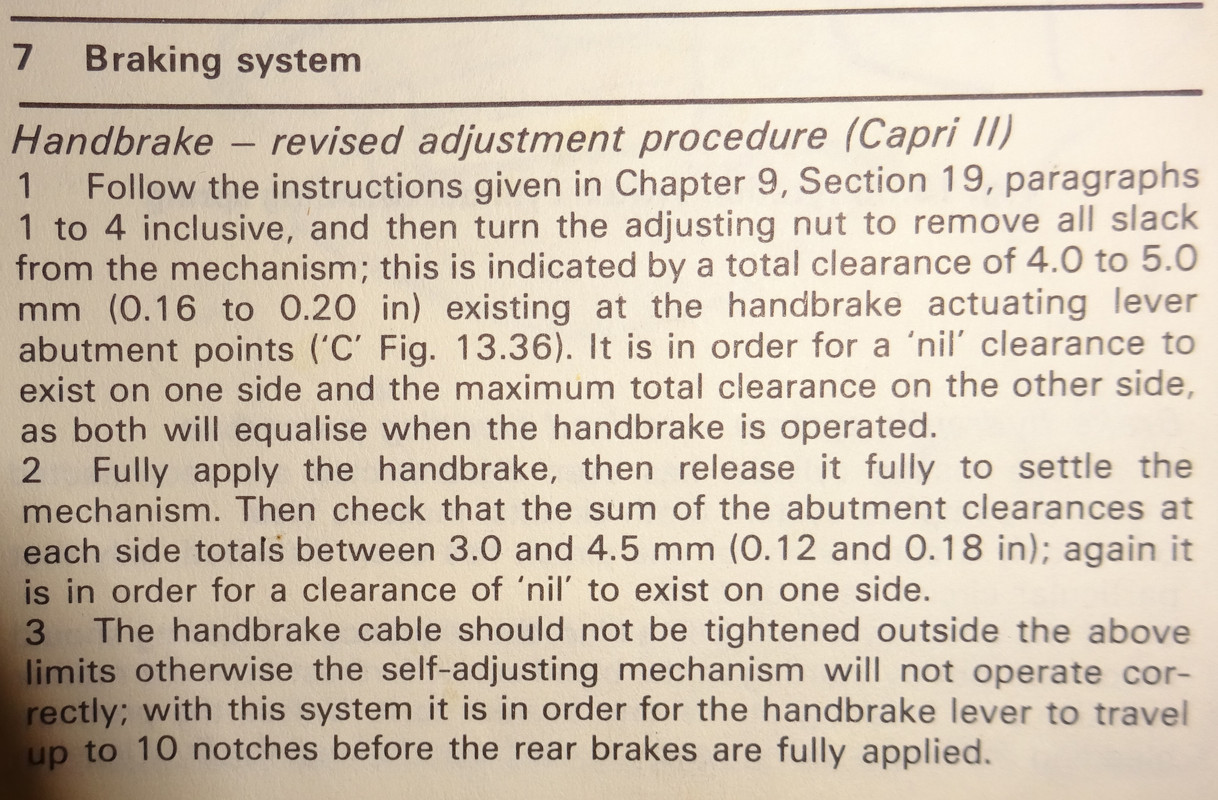
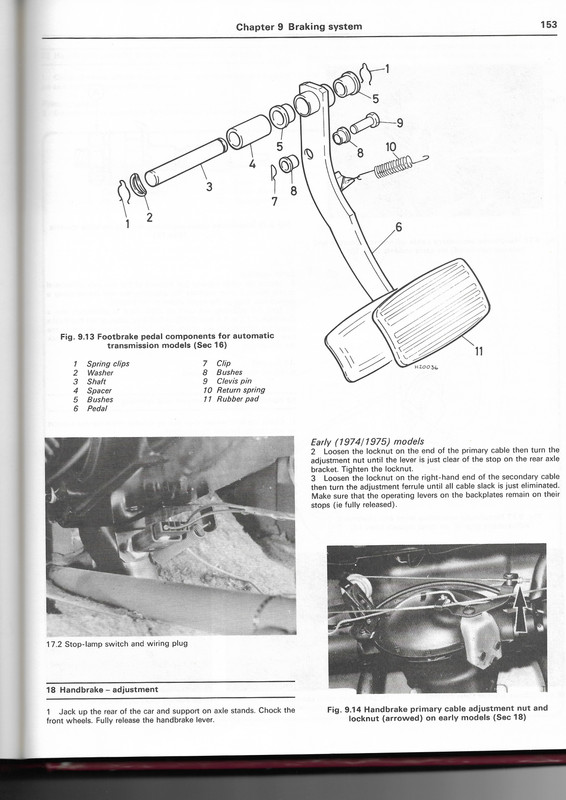
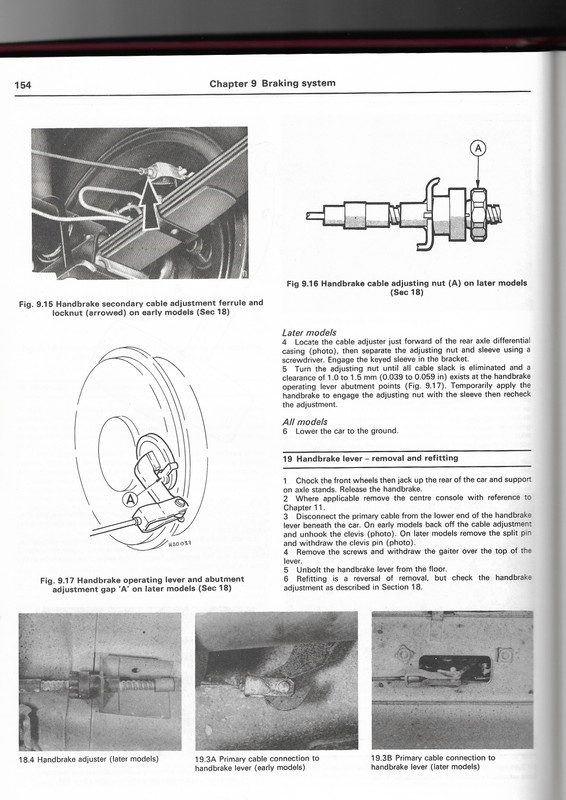
It`s a bit bewildering as apparently there was a changed adjustment procedure for later models (presumably with the nylon adjuster?) TBH I wouldn`t have anything like this much travel but this is what Ford recommend. I make no recommendations or comments, just present the info I have.
Re: Handbrake adjustment
Posted: Tue Dec 03, 2019 4:20 pm
by Bug
stevemarl wrote: ↑Tue Dec 03, 2019 4:00 pm
It`s a bit bewildering as apparently there was a changed adjustment procedure for later models (presumably with the nylon adjuster?) TBH I wouldn`t have anything like this much travel but this is what Ford recommend. I make no recommendations or comments, just present the info I have.
Yup, I read that a long while back. I think it refers to the gap between the back-plate and the plastic buffer that is fitted onto the actuating lever.
To be honest, after reading it, I carried on with the method described above, regardless of the Capri's age. (Except of course for the different adjustment system fitted to some earlier cars)
As a caveat to the procedure I've described above, I should perhaps point out that I would make a habit of stripping and cleaning the handbrake mechanism at least yearly, so I guess I never really gave it a chance to have to self adjust.
Re: Handbrake adjustment
Posted: Tue Dec 03, 2019 8:21 pm
by Andrew 2.8i
stevemarl wrote: ↑Tue Dec 03, 2019 4:00 pm
It`s a bit bewildering as apparently there was a changed adjustment procedure for later models (presumably with the nylon adjuster?) TBH I wouldn`t have anything like this much travel but this is what Ford recommend.
Is that excerpt from your Haynes manual? My official Ford Workshop manual, the orange one, makes no reference to the adjustment procedure for later models, only the early models.
My Haynes manual has a different take on the adjustment procedure for later models.
Andrew.
Re: Handbrake adjustment
Posted: Tue Dec 03, 2019 9:40 pm
by stevemarl
Andrew 2.8i wrote: ↑Tue Dec 03, 2019 8:21 pm
Is that excerpt from your Haynes manual?
Yes it is , it`s an early Haynes (MkII includes `78 on MkIII) I also have the orange `official` workshop manual, that seems to have 2 brake sections one at the front dated `74 and another more detailed one near the back lifted from the original `69 manual (which I also have, 50p from a jumble sale) but none of them seem to be appropriate to the later Mk3? Certainly mine doesn`t have the old pivot lever on the diff system which it shows. Was that the old `English` axle? One of the Martins will know.
I don`t know where Haynes got that info but it looks authentic. I still think `up to 10 notches` is excessive though?.
Re: Handbrake adjustment
Posted: Tue Dec 03, 2019 9:47 pm
by Andrew 2.8i
stevemarl wrote: ↑Tue Dec 03, 2019 9:40 pm
I still think `up to 10 notches` is excessive though?.
I agree. What's the standard required for an MOT pass? I always thought it was 4-6 clicks on the ratchet, something like that. The MOT man might consider 10 clicks as excessive travel. I appreciate that Haynes mentions 10 clicks as the maximum possible travel on the handbrake and in the vast majority of cases the travel might not be anywhere near that.
Andrew.
Re: Handbrake adjustment
Posted: Tue Dec 03, 2019 9:52 pm
by stevemarl
Andrew,
I`ve always thought 4-5 clicks for the MOT too. I suppose if you were on good terms with the tester you could show them the book? Just can`t see 6 clicks being too tight?
Re: Handbrake adjustment
Posted: Wed Dec 04, 2019 8:56 am
by Bug
If you really can't get your head around the Haynes manual then why not give my method a go. It works.

Your manual does indeed seem to show the old set up with various pulleys etc. Interestingly though, it shows it on a Salisbury axle, whereas more commonly that arrangement appeared on the front loading Timken axle.
A wild stab in the dark, but don't suppose you're near Norfolk?
If so, I'm more than happy for you to bring your car over and I'll talk you through the process.
Re: Handbrake adjustment
Posted: Wed Dec 04, 2019 10:51 am
by Not_Anumber
The state of components plays a large part in the how many clicks the handbrake has to be setup with.
On a previous Capri I found I always needed it adjusted to at least 6 clicks to avoid the shoes rubbing against the drums when the handbrake was off.
Mine now works perfectly on 3 clicks. The difference is just because I started with clean or replaced parts when I replaced the rear axle; new cylinders, cleaned up backplate, springs and adjusters, new bush on the diff cover for the handbrake rod etc. Solid and precise.
Re: Handbrake adjustment
Posted: Wed Dec 04, 2019 12:41 pm
by Bug
Not_Anumber wrote: ↑Wed Dec 04, 2019 10:51 am
The state of components plays a large part in the how many clicks the handbrake has to be setup with.
On a previous Capri I found I always needed it adjusted to at least 6 clicks to avoid the shoes rubbing against the drums when the handbrake was off.
Mine now works perfectly on 3 clicks. The difference is just because I started with clean or replaced parts when I replaced the rear axle; new cylinders, cleaned up backplate, springs and adjusters, new bush on the diff cover for the handbrake rod etc. Solid and precise.
If you follow the method I suggest (albeit more fiddly and time consuming) then the state of the components shouldn't matter. They will all be clean, moving freely and the amount of wear on the shoes will be negated by setting them up correctly with regard to clearing the drum.
Remember that the handbrake lever is only the final the final piece of the puzzle. it is used to operate the handbrake system and only imparts a linear movement to a cable. From there backward, the operation is governed by how it is all adjusted.
Assuming 3 clicks is being taken as the 'correct' setting, then every additional click is an audible indication that the initial set up is not quite right.
I ran my 2.8i for over 140k and only had one new set of rear shoes in that time. Yet every year over those 26 years I adjusted the handbrake linkage (usually to be sure it was ok for the MOT), and it always retained the same lever movement after adjustment, regardless of the level of the shoes.
Re: Handbrake adjustment
Posted: Fri May 08, 2020 7:41 am
by Owent2005
Morning all,
I know it’s been a while but I’ve been out of the country and have just had chance to finish what I started before Christmas!
After stripping the rear brakes I found that both handbrake linkages were seized. After freeing them off and resetting the brake shoes, I then used Bug’s method to set the handbrake which, tbh, took little time as it wasn’t far off once everything was un-seized and re-set.
Thanks for the tips,
Owen