BMW headlight conversion: The "definitive" tutorial.
Posted: Thu Jan 05, 2017 9:21 pm
Hello everyone.
I wanted to do something about my dull Capri headlights, but instead of just waste money on a new set of OE spec lights that will only marginally improve on what I already have I decided to investigate what this "BMW conversion" is that everyone is talking about...and by "everyone" I mean a couple of people on the internet somewhere.
I've only seen a few people talk about this, and even fewer people share detailed and clear info on how its done. Now i'm not Tony Stark, or a genius by any means so doing this sort of thing isn't really my forte so a lot of clear and detailed info was needed so I knew what I was doing before I pulled the trigger on a set of expensive lights, or if I could even tackle this job in the first place!
What info I did find was a bit vague and confusing in places but I thought I had enough to figure it out so I decided this was the route I wanted to take as I liked the way these BMW lights looked on a Capri, and the projector style lens would give me the upgrade I was looking for too so I snapped up a set of (rather cheap) BMW E34 "angel eye" headlights off of eBay and went at it.
Needless to say my first attempt was not a success, and I ruined a perfectly good set of Capri backing plates in the process. (luckily I had a spare set)
This...lets call it "learning experience" (due to a lack of some vital info I felt) prompted me to make my own tutorial to hopefully aid those who decide to tackle this mod in the future and avoid the hiccups I encountered which for me wasn't that big of a deal but for those without access to spares like I did could prove to be a major frustration.
Again, not having a go at anyone who has shared their knowledge on how to do this in the past, nor is this intended to replace that knowledge or anything like that and I value the advice I gained from those sources, I'm just trying to make it a little bit clearer and more concise to hopefully help avoid any possible problems like I encountered due to a slight lack of info should anyone decide to do this mod in the future by making this tutorial.
Anyway, lets get on with it!
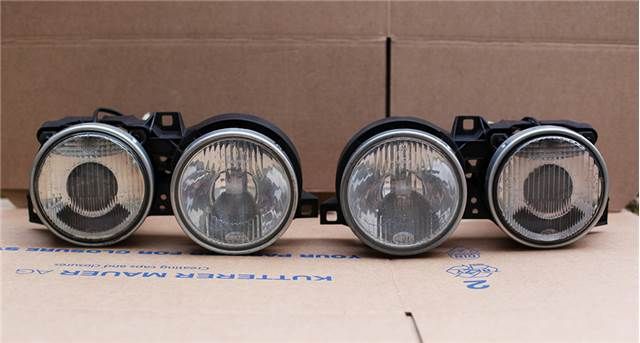
First up you'll need your lights! Now this mod works with either the standard BMW "smiley" lights seen here:
Or the "angel eye" variant:
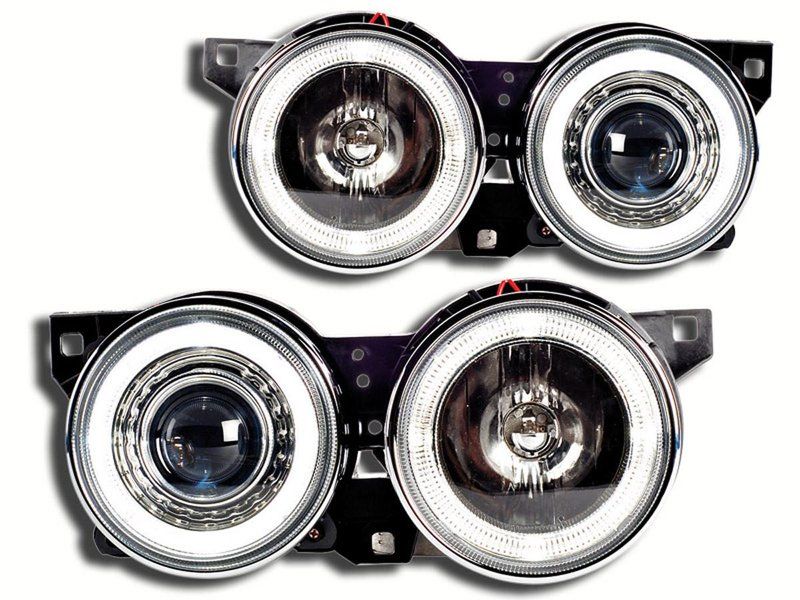
Which is what I used. The process is exactly the same, it just comes down to personal taste. As long as they fit the E30 or E34 BMW models you'll be fine and dandy for this mod!
Now once you have your lights you need to remove them from the BMW backing plates. In my case they were made out of plastic, and the locking tabs didn't want to budge so I just cut them out, since we'll be cutting a considerable amount of material away later this doesn't really matter, but its up to you at this stage. Just get that light out of the backing plate!
(cheeky stolen photo of the backing plates from Google as I didn't take pictures at this stage as I had no plans on making a tutorial yet, hence the quotation marks around the word "definitive". Hey, at least i'm honest!)
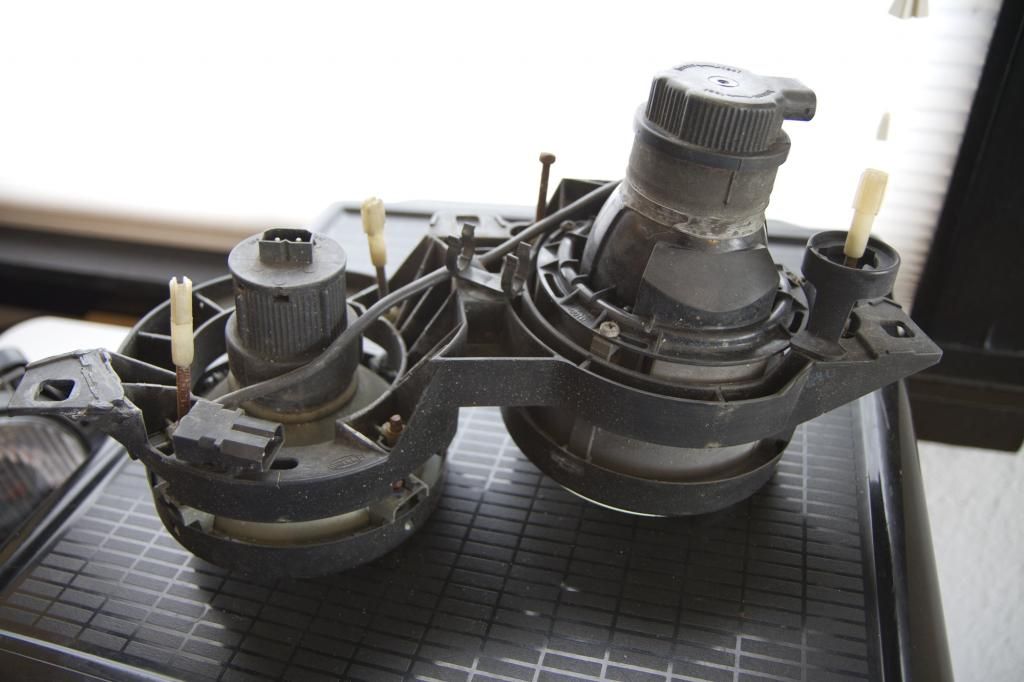
Now, with the lights removed from the backing plates (again, stolen photo from Google) you can see the mounting brackets on the sides.
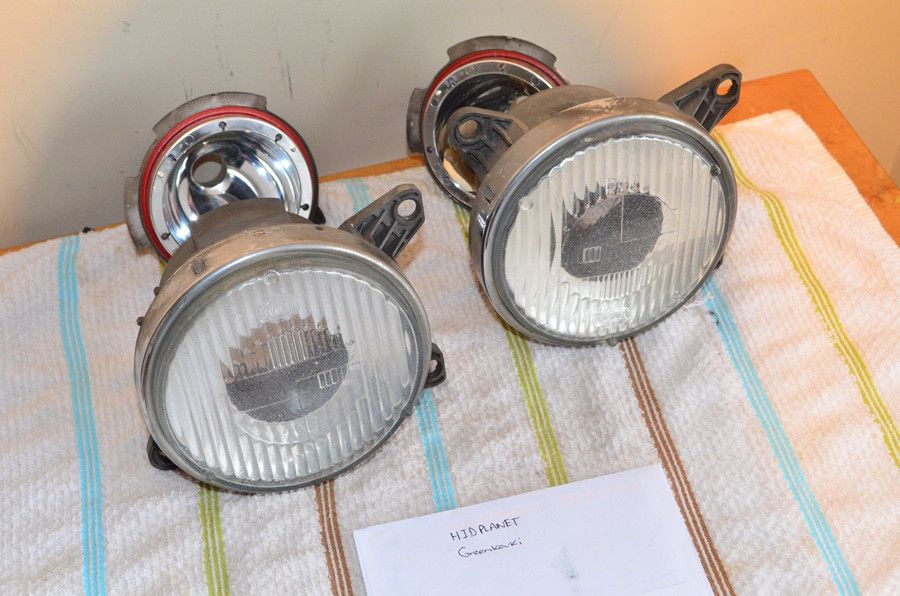
Time to start removing material. With your weapon of choice (I used a power file) start removing the old mounting brackets/tabs until your lights are nice and smooth and almost perfectly round, like in the following photos: (these ones are mine I promise!)
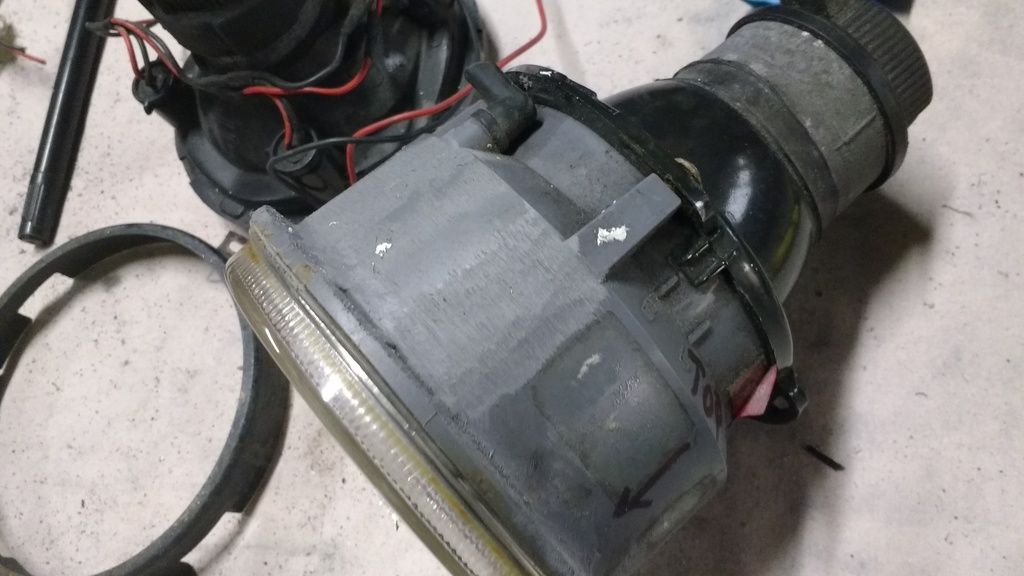
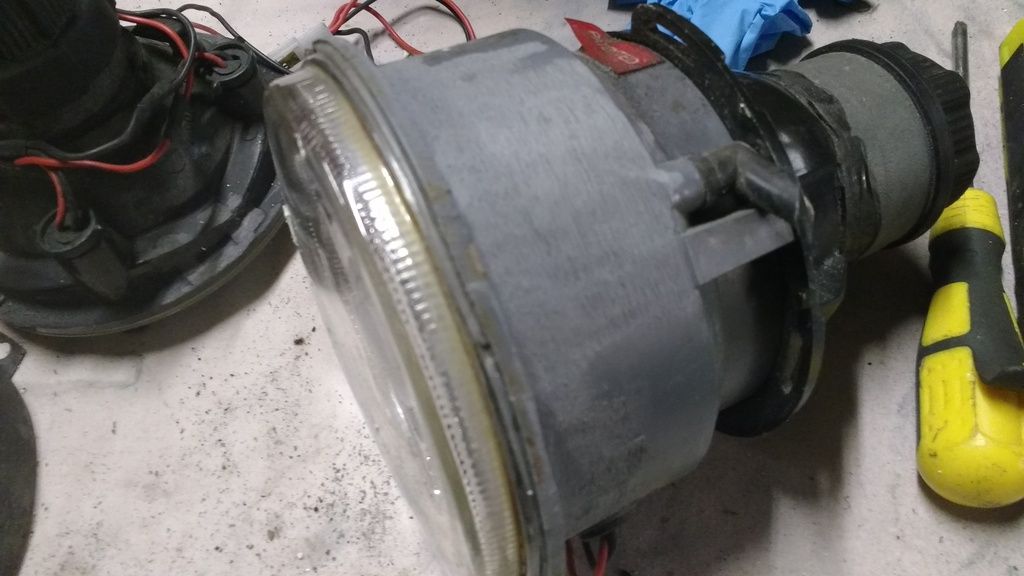
You basically want to get rid of the old mounting brackets that would attach the lights to the old BMW backing plates. Be very careful during this stage as you can go too far and remove too much material and ruin the light and cut through to the innards so be careful!
I'd recommend cutting the worst of the material off with a power tool to save time and effort and once you are happy take the rest of by hand with some sand paper, you can also smooth it down and make it look nice like I did this way too.
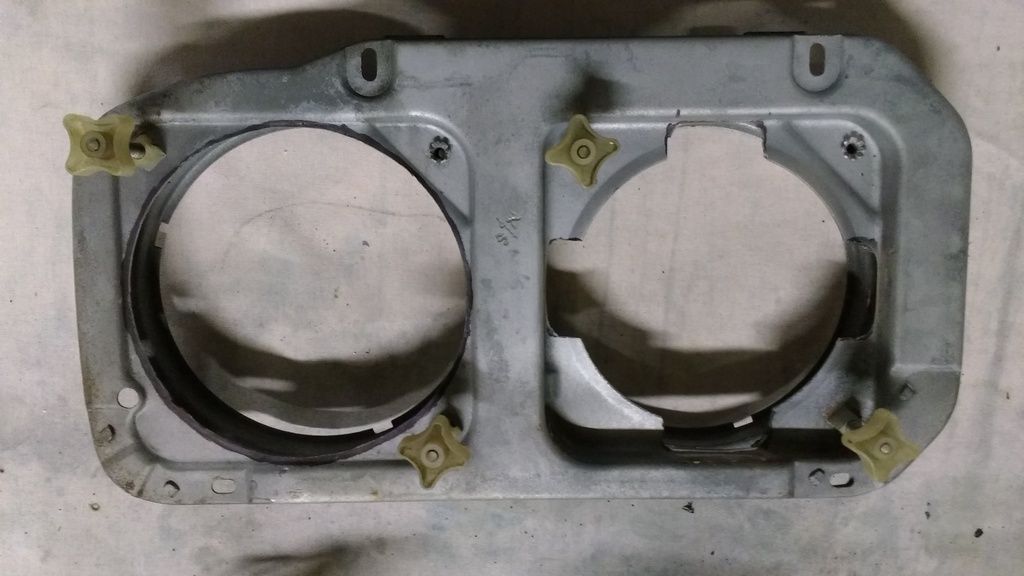
With that all done it's time to start modifying the Capri backing plates, this is a tad more difficult since we're working with metal now.
As you can see the old backing plates are too small to fit the backs of the larger diameter BMW lights.
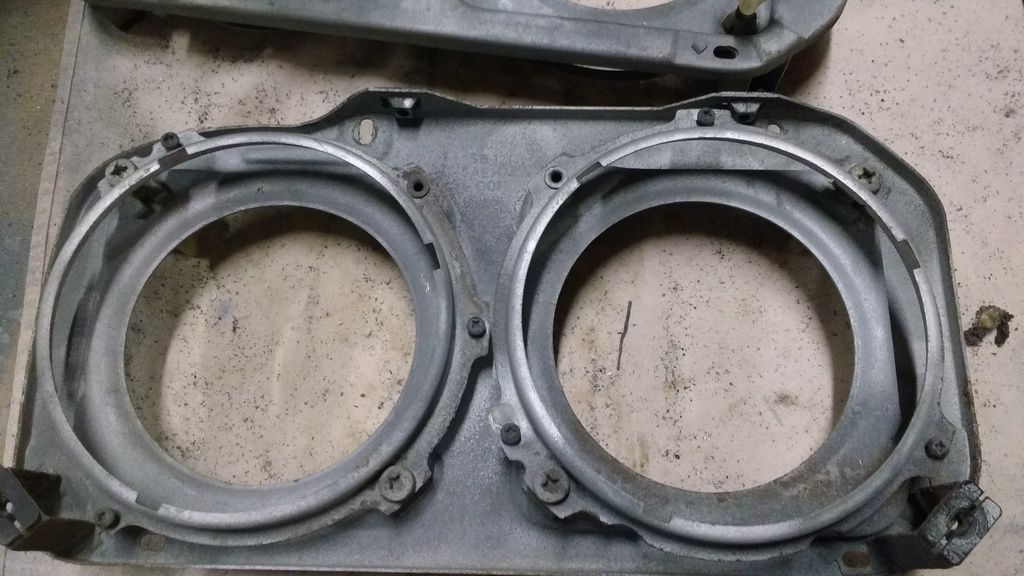
I marked so you can see how much material needs to be removed to fit the lights. On my lights the dipped beam required the most material to be removed, whereas the high beam only required 4 small notches to be cut out (on mine this is where the omni-directional angel eye ring and bulbs are housed), since those lights dont have the deep recessed body of the dipped beam which contains the projector housing.
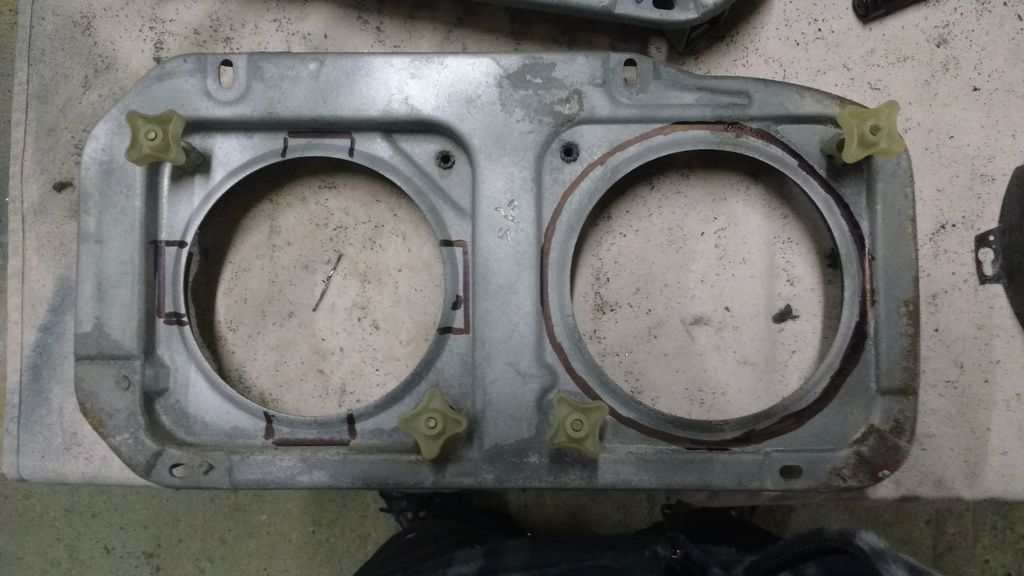
At this stage I would just like to add that you do not have to remove anything else from these backing plates to do this mod. You can leave the adjusters and the adjustment rings in place as they are, do NOT remove anything from the backing plates apart from the retaining rings for this mod! This is where I went wrong, dont be a dingbat like me!
For this I used a grinder with a grinding disc to cut the large holes for the dipped beam, switched to a cutting disc for the small notches for the high beam and used a power file to grind down the edges to make them square.
Once you've made your cuts test fit your lights.
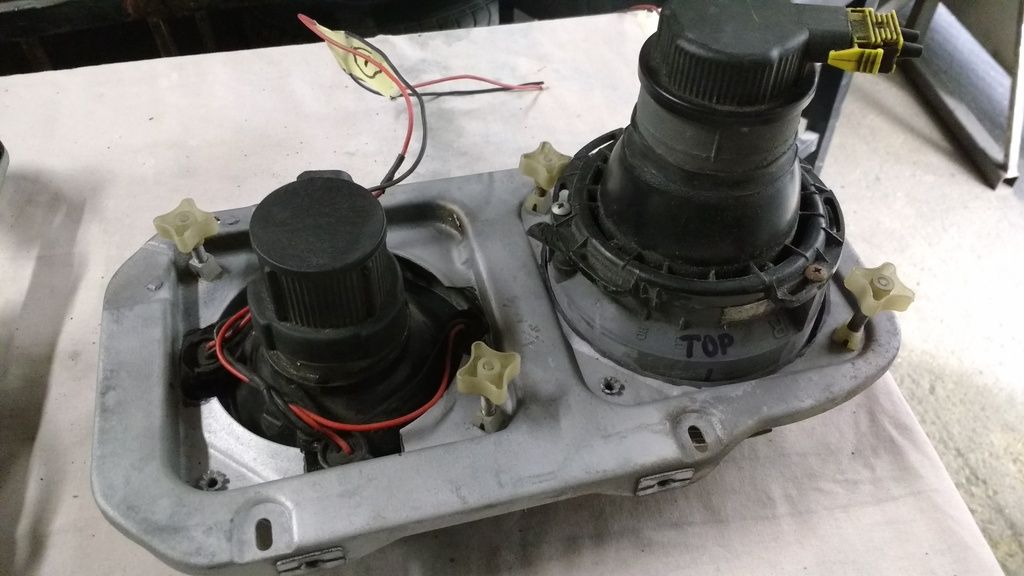
Be sure you leave a couple of millimetres spare between the lights and holes in the backing plates. You need this extra space or you wont be able to adjust your lights' beam position.
Based on info I saw in previous threads on this mod, people recommend leaving 2 to 3mm spare, so if you find your light is a snug fit you either need to cut more material out of the backing plate, or you need to cut more off of your lights.
Based on my experience, if you've cut exactly where I have shown you out of the backing plate you'll likely need to shave a bit of extra material off of the light itself. I'd say do this by hand with sand paper to ensure you dont go too mad.
Once you are happy with the fit, it cant hurt to tidy things up a bit and prevent any rust from appearing in the future, as these backing plates are prone to rot. I used black non-Hammerite paint on mine, same stuff just different name since Hammerite is a bit watered down and poop these days by all accounts.
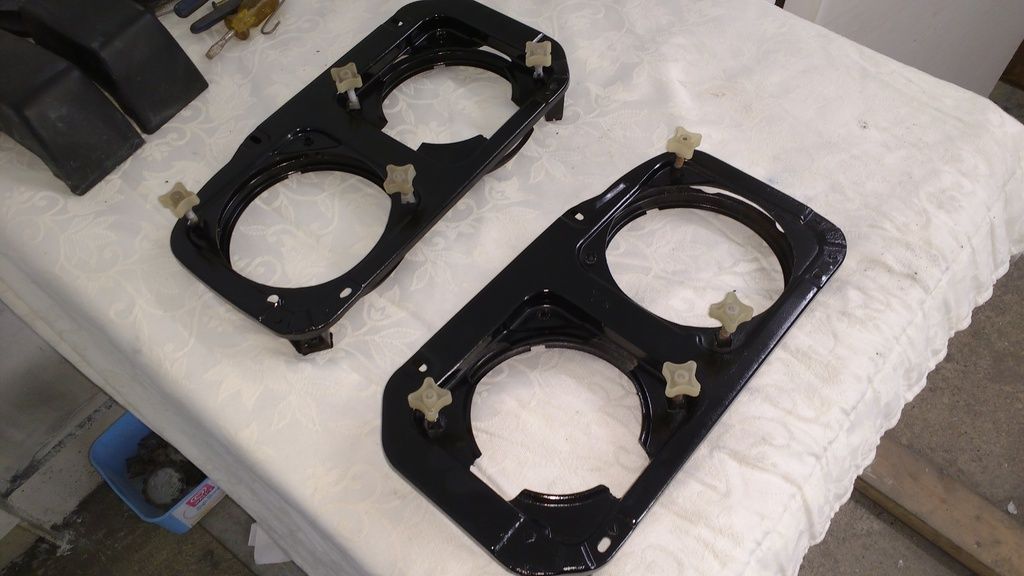
Did the same to the retaining rings as well, but you can of course do to these as you wish based on your own preference/tastes.
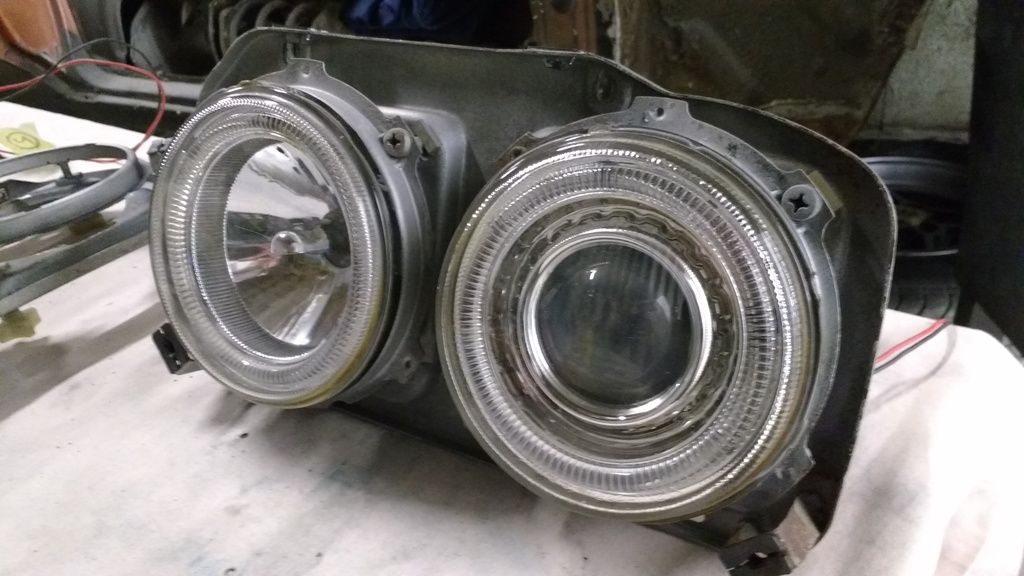
One small issue you might run into as I did, is once you try to fit the retaining rings (which is the final step) your lights might seem loose and rattle about inside the backing plates. This obviously isn't very good as your light beam will flicker and wobble all over the place at night and (even worse) look utterly pants to boot! This is because the retaining rings just arent......well..."retaining" the lights tight enough but I came up with a very simple solution to this problem:
Get some self adhesive felt, about 1 or 2 cm thick:

And stick two small pieces of it to the insides of the retaining rings on opposite sides of each other:
Sorted! The lights now fit snugly and dont jiggle about as the extra thickness the felt provides add's just enough extra material to hold them tightly in place whilst still allowing you to properly adjust the lights as you normally would if they were OE spec! (providing you've cut out the backing plates properly that is
Voila!
Onto wiring.....weeeelllll.....that's up to you. I had a friend who IS Tony Stark wire mine up for me
Great thing is he did it in such a way that if I get bored of this upgrade or I decide I no longer like the way they look (let's face it this isn't for everybody, i'm aware some find this mod the equivalent of sticking sovereigns on the front of your Capri, or "chavving it up" so to speak. Whatevs people, my car my decision) I can just unplug them and plug in my old lights with no re-wiring or modding required.
The angel eyes wire up to the side lights and i'm sure you can figure out the rest, but I dont touch electrics with a ten foot pole so i'll leave that one up to you!
Here's mine all wired up and looking pretty cool. My car isnt finished yet so no full shots, but i'll get taken once she's on the road (hopefully) soon.
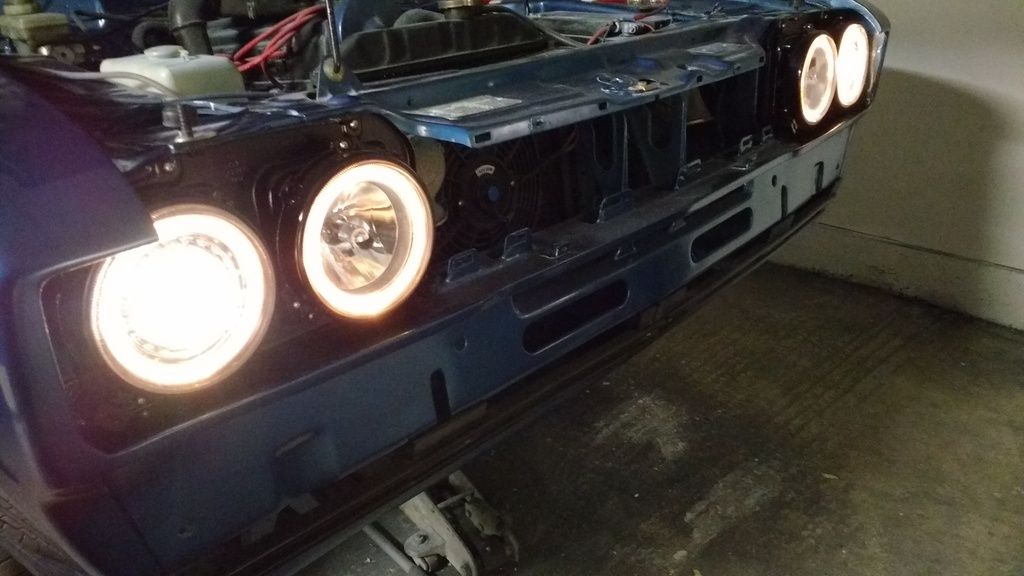
Chavtastic!
It remains to be seen how much of an upgrade these projectors are over my old standard Ford lights with H4 bulbs, seeing how I haven't been out at night with them yet but in any case I like the way they look. At first I wasn't convinced and thought they might look pants but I've definitely *snicker*.......seen the light. Hahaha, see what I did there? lol
I'll stop now. I was gonna add more puns about Photons and light speed and what not but i'm afraid people will hate me even more then they already do. -_-
Hope this shines some light on the situation.
Thanks to Mellow Yellow for his original thread and giving me the idea, hope he doesn't mind me expanding on it.
I wanted to do something about my dull Capri headlights, but instead of just waste money on a new set of OE spec lights that will only marginally improve on what I already have I decided to investigate what this "BMW conversion" is that everyone is talking about...and by "everyone" I mean a couple of people on the internet somewhere.
I've only seen a few people talk about this, and even fewer people share detailed and clear info on how its done. Now i'm not Tony Stark, or a genius by any means so doing this sort of thing isn't really my forte so a lot of clear and detailed info was needed so I knew what I was doing before I pulled the trigger on a set of expensive lights, or if I could even tackle this job in the first place!
What info I did find was a bit vague and confusing in places but I thought I had enough to figure it out so I decided this was the route I wanted to take as I liked the way these BMW lights looked on a Capri, and the projector style lens would give me the upgrade I was looking for too so I snapped up a set of (rather cheap) BMW E34 "angel eye" headlights off of eBay and went at it.
Needless to say my first attempt was not a success, and I ruined a perfectly good set of Capri backing plates in the process.
This...lets call it "learning experience" (due to a lack of some vital info I felt) prompted me to make my own tutorial to hopefully aid those who decide to tackle this mod in the future and avoid the hiccups I encountered which for me wasn't that big of a deal but for those without access to spares like I did could prove to be a major frustration.
Again, not having a go at anyone who has shared their knowledge on how to do this in the past, nor is this intended to replace that knowledge or anything like that and I value the advice I gained from those sources, I'm just trying to make it a little bit clearer and more concise to hopefully help avoid any possible problems like I encountered due to a slight lack of info should anyone decide to do this mod in the future by making this tutorial.
Anyway, lets get on with it!
First up you'll need your lights! Now this mod works with either the standard BMW "smiley" lights seen here:
Or the "angel eye" variant:
Which is what I used. The process is exactly the same, it just comes down to personal taste. As long as they fit the E30 or E34 BMW models you'll be fine and dandy for this mod!
Now once you have your lights you need to remove them from the BMW backing plates. In my case they were made out of plastic, and the locking tabs didn't want to budge so I just cut them out, since we'll be cutting a considerable amount of material away later this doesn't really matter, but its up to you at this stage. Just get that light out of the backing plate!
(cheeky stolen photo of the backing plates from Google as I didn't take pictures at this stage as I had no plans on making a tutorial yet, hence the quotation marks around the word "definitive". Hey, at least i'm honest!)
Now, with the lights removed from the backing plates (again, stolen photo from Google) you can see the mounting brackets on the sides.
Time to start removing material. With your weapon of choice (I used a power file) start removing the old mounting brackets/tabs until your lights are nice and smooth and almost perfectly round, like in the following photos: (these ones are mine I promise!)
You basically want to get rid of the old mounting brackets that would attach the lights to the old BMW backing plates. Be very careful during this stage as you can go too far and remove too much material and ruin the light and cut through to the innards so be careful!
I'd recommend cutting the worst of the material off with a power tool to save time and effort and once you are happy take the rest of by hand with some sand paper, you can also smooth it down and make it look nice like I did this way too.
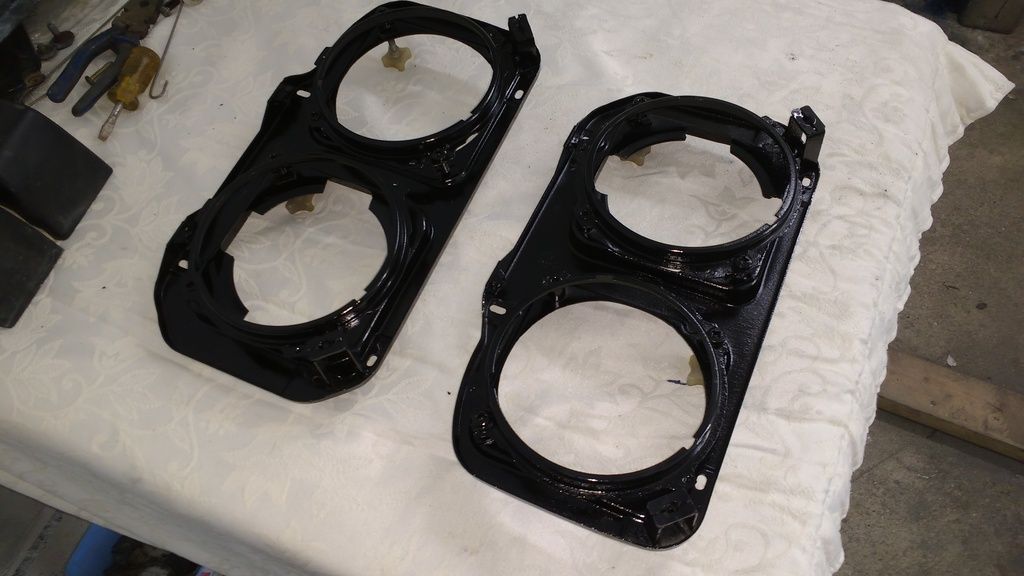
With that all done it's time to start modifying the Capri backing plates, this is a tad more difficult since we're working with metal now.
As you can see the old backing plates are too small to fit the backs of the larger diameter BMW lights.
I marked so you can see how much material needs to be removed to fit the lights. On my lights the dipped beam required the most material to be removed, whereas the high beam only required 4 small notches to be cut out (on mine this is where the omni-directional angel eye ring and bulbs are housed), since those lights dont have the deep recessed body of the dipped beam which contains the projector housing.
At this stage I would just like to add that you do not have to remove anything else from these backing plates to do this mod. You can leave the adjusters and the adjustment rings in place as they are, do NOT remove anything from the backing plates apart from the retaining rings for this mod! This is where I went wrong, dont be a dingbat like me!
For this I used a grinder with a grinding disc to cut the large holes for the dipped beam, switched to a cutting disc for the small notches for the high beam and used a power file to grind down the edges to make them square.
Once you've made your cuts test fit your lights.
Be sure you leave a couple of millimetres spare between the lights and holes in the backing plates. You need this extra space or you wont be able to adjust your lights' beam position.
Based on info I saw in previous threads on this mod, people recommend leaving 2 to 3mm spare, so if you find your light is a snug fit you either need to cut more material out of the backing plate, or you need to cut more off of your lights.
Based on my experience, if you've cut exactly where I have shown you out of the backing plate you'll likely need to shave a bit of extra material off of the light itself. I'd say do this by hand with sand paper to ensure you dont go too mad.
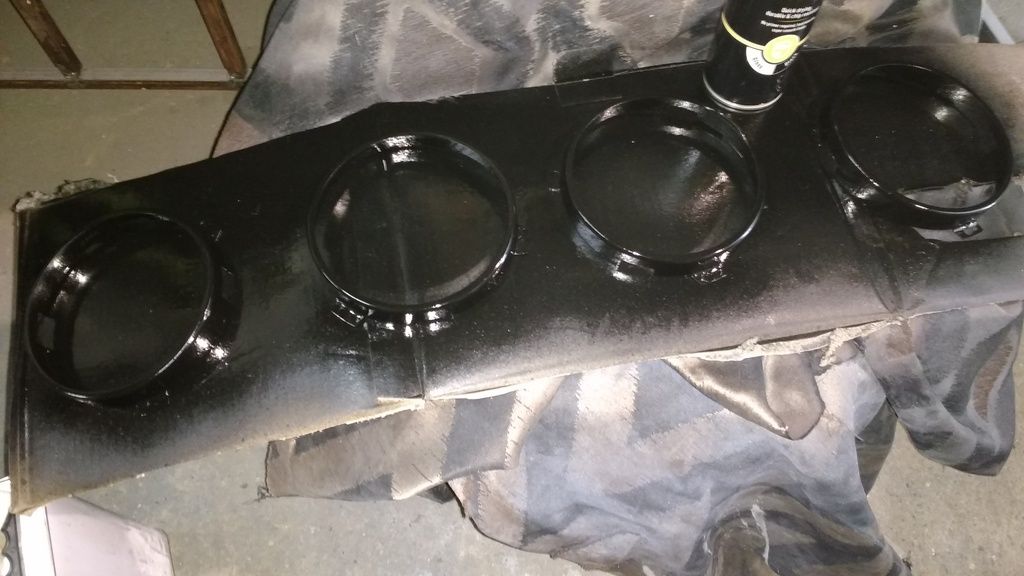
Once you are happy with the fit, it cant hurt to tidy things up a bit and prevent any rust from appearing in the future, as these backing plates are prone to rot. I used black non-Hammerite paint on mine, same stuff just different name since Hammerite is a bit watered down and poop these days by all accounts.
Did the same to the retaining rings as well, but you can of course do to these as you wish based on your own preference/tastes.
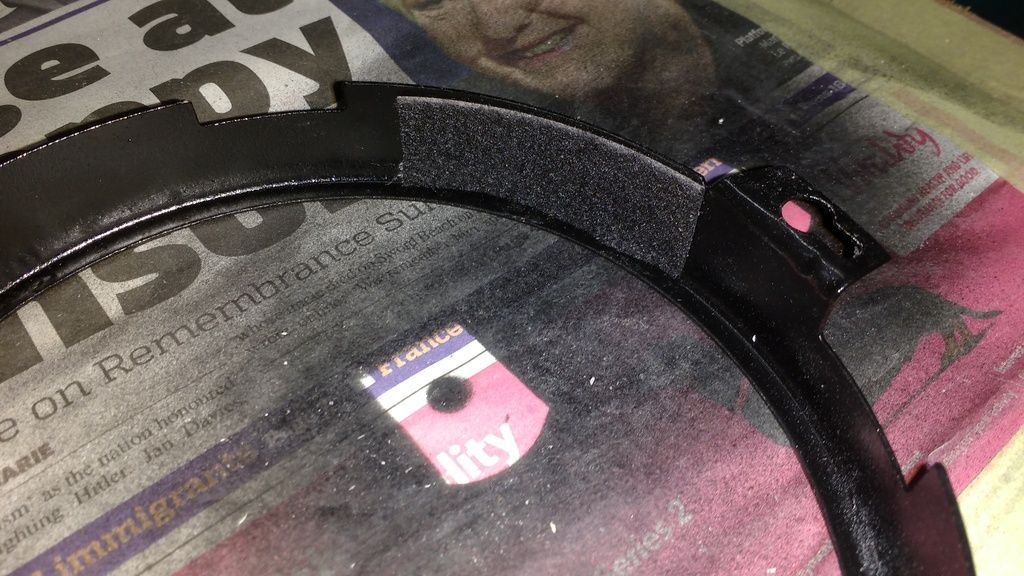
One small issue you might run into as I did, is once you try to fit the retaining rings (which is the final step) your lights might seem loose and rattle about inside the backing plates. This obviously isn't very good as your light beam will flicker and wobble all over the place at night and (even worse) look utterly pants to boot! This is because the retaining rings just arent......well..."retaining" the lights tight enough but I came up with a very simple solution to this problem:
Get some self adhesive felt, about 1 or 2 cm thick:
And stick two small pieces of it to the insides of the retaining rings on opposite sides of each other:
Sorted! The lights now fit snugly and dont jiggle about as the extra thickness the felt provides add's just enough extra material to hold them tightly in place whilst still allowing you to properly adjust the lights as you normally would if they were OE spec! (providing you've cut out the backing plates properly that is
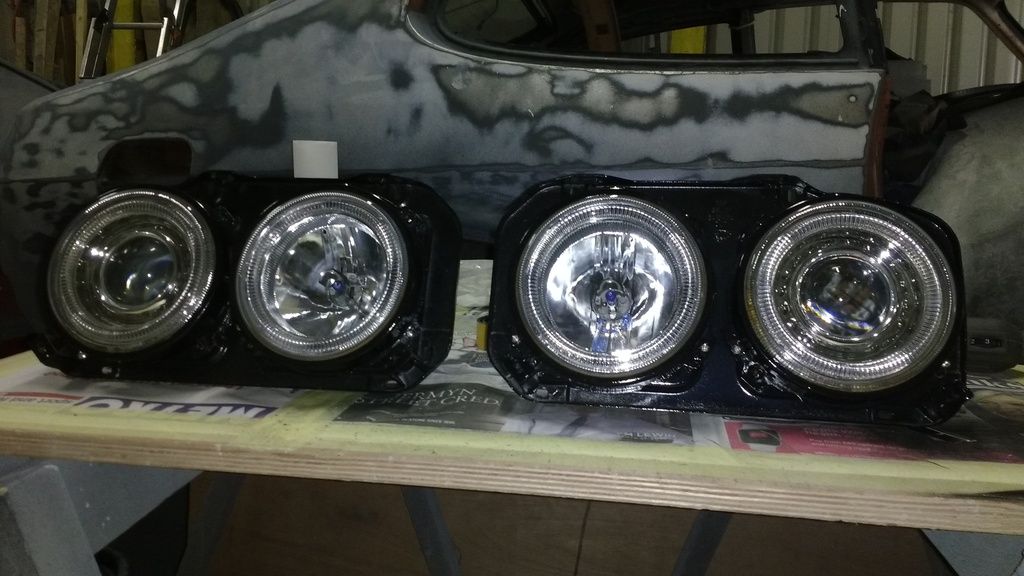
Voila!
Onto wiring.....weeeelllll.....that's up to you. I had a friend who IS Tony Stark wire mine up for me
Great thing is he did it in such a way that if I get bored of this upgrade or I decide I no longer like the way they look (let's face it this isn't for everybody, i'm aware some find this mod the equivalent of sticking sovereigns on the front of your Capri, or "chavving it up" so to speak. Whatevs people, my car my decision) I can just unplug them and plug in my old lights with no re-wiring or modding required.
The angel eyes wire up to the side lights and i'm sure you can figure out the rest, but I dont touch electrics with a ten foot pole so i'll leave that one up to you!
Here's mine all wired up and looking pretty cool. My car isnt finished yet so no full shots, but i'll get taken once she's on the road (hopefully) soon.
Chavtastic!
It remains to be seen how much of an upgrade these projectors are over my old standard Ford lights with H4 bulbs, seeing how I haven't been out at night with them yet but in any case I like the way they look. At first I wasn't convinced and thought they might look pants but I've definitely *snicker*.......seen the light. Hahaha, see what I did there? lol
I'll stop now. I was gonna add more puns about Photons and light speed and what not but i'm afraid people will hate me even more then they already do. -_-
Hope this shines some light on the situation.
Thanks to Mellow Yellow for his original thread and giving me the idea, hope he doesn't mind me expanding on it.

