Megajolt VR Sensor Bracket
- Beakster
- Donator
- Posts: 3980
- Joined: Sun Jul 27, 2008 10:16 pm
- Car(s): 1983 Ford Capri 2.9 24V Cosworth Injection
- Location: Toronto, Canada
- Contact:
Megajolt VR Sensor Bracket
Hi,
Had a first look under the car at how I'm going to do the sensor bracket. I can see 1 bolt that I know needs to be replaced with some stud. What size and thread do I need to ask for when buying this stud, and what kind of place would sell it, B&Q?
Also, does the bracket just attach to a singe stud, or is there a place to put a 2nd on under the cam belt cover?
Thanks
-Chris
- nigecapri
- Posts: 5795
- Joined: Mon Jul 28, 2008 6:31 am
- Car(s): Black 2.0S with supercharged bike carbs.
- Location: http://www.blacklabradorpuppies.co.uk/
- Contact:
cambelt cover?
Ah yes, I remember them.
My bolts came from my nuts & bolts & bits box, it was off a mitsu van I scrapped a few weeks back for spares - it's a long, thin one you need
A spare oversize nut and tube spacer for the one at the corner to bring it out level with the other hole. Watch out for the bracket catching on the lip of the sump, mine was being held off at the lower edge so I ground away a bit of the sump rolled-edge. Best to measure the full length available for both bolts & get the longest that will fit as they're only diddly threads & need to be well-tight.
- Beakster
- Donator
- Posts: 3980
- Joined: Sun Jul 27, 2008 10:16 pm
- Car(s): 1983 Ford Capri 2.9 24V Cosworth Injection
- Location: Toronto, Canada
- Contact:
Re: cambelt cover?
Cheers Nige... How thick is that steel you used for the bracket? I have some 3mm stuff I was planning to use. Think that will be enough?
Looks like there is a 2nd bolt hole behind the cam cover so I'll have to chuck it.
Re: cambelt cover?
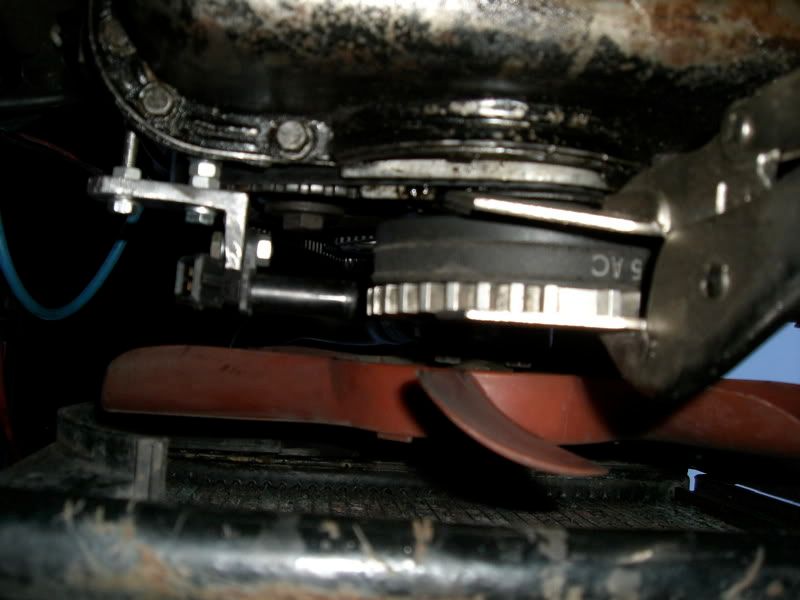
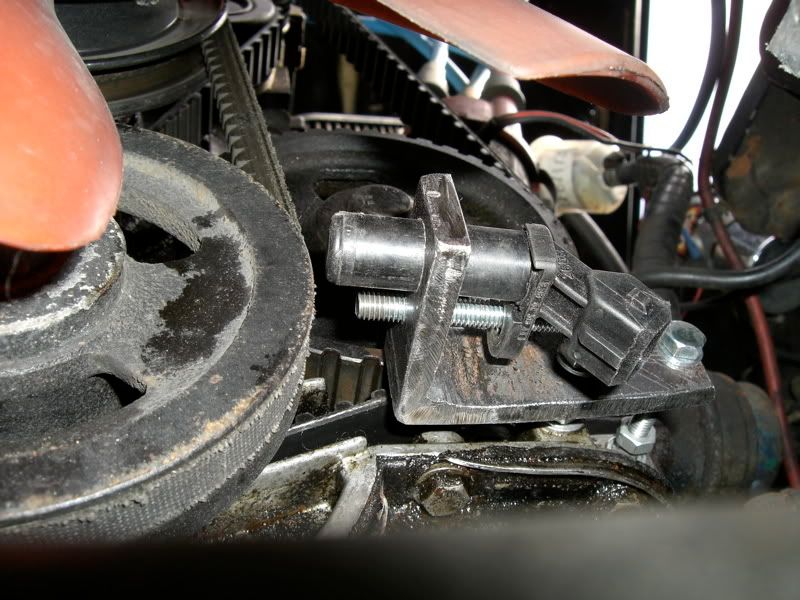
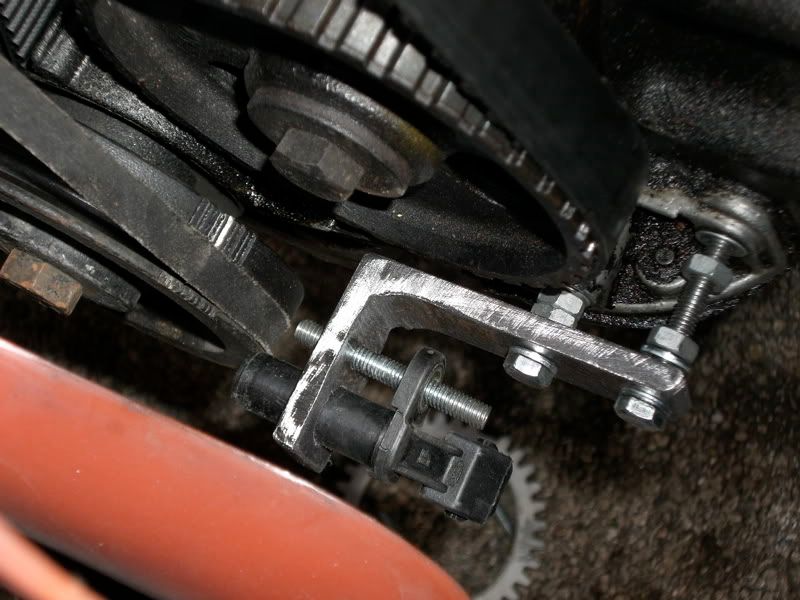
as you can see, using the stud and lock nuts allows some adjustment of the angle of my brackets. They are alluminum and are quite flexible, which isn't entirely ideal, but they don't seem to vibrate when the engine is running as they are triangulated.
A Capri is for life... NOT just for Christmas
- Beakster
- Donator
- Posts: 3980
- Joined: Sun Jul 27, 2008 10:16 pm
- Car(s): 1983 Ford Capri 2.9 24V Cosworth Injection
- Location: Toronto, Canada
- Contact:
Re: cambelt cover?
Ta Colin,
If I just go to an Ironmongers and ask for M6 stud will it have the correct thread? I'll take the cam cover off tonight so I can take the bolts with me to make sure.
I'm thinking of more of a Nige design than a Colin one, as Nige's looks a bit easier. I might weld a bar across the right angle too so as to prevent vibrations.
Cheers
-Chris
- nigecapri
- Posts: 5795
- Joined: Mon Jul 28, 2008 6:31 am
- Car(s): Black 2.0S with supercharged bike carbs.
- Location: http://www.blacklabradorpuppies.co.uk/
- Contact:
Heavy Metal
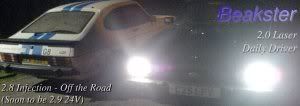
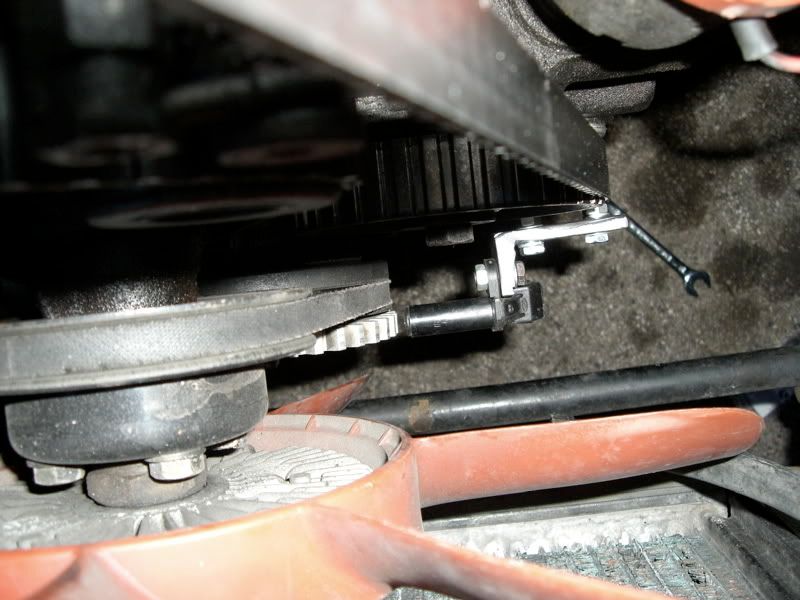
The original bracket that came with my kit didn't really look up to the job, that's it sat on the heavier stuff, it did run but I wanted something a bit more sturdy:
Picture the metal crates used for lifting things by forklift, a flat plate each corner for feet & angle iron frame, that's what I think mine came off?
Not an easy job, knackered elbows from hacksawing & filling all night - but it won't be going anywhere it's not supposed to.
Picture the metal crates used for lifting things by forklift, a flat plate each corner for feet & angle iron frame, that's what I think mine came off?
Not an easy job, knackered elbows from hacksawing & filling all night - but it won't be going anywhere it's not supposed to.
-
- Posts: 344
- Joined: Mon Jul 28, 2008 2:21 pm
- Car(s): Mk1 5.0L
Mk2 2.8L - Location: Ocean Shores, Washington, US of A
There is no...
Kill, like over kill, and thats a perfect
example of "Over Kill"...
SteveL
example of "Over Kill"...
SteveL
SteveL
Too many toys to list...
- Beakster
- Donator
- Posts: 3980
- Joined: Sun Jul 27, 2008 10:16 pm
- Car(s): 1983 Ford Capri 2.9 24V Cosworth Injection
- Location: Toronto, Canada
- Contact:
Beakster Bracket v0.1
Spend 7 hours playing with metal.
Not happy though. I was aiming for a gap of 1-2mm, but I've ended up with 4-5mm. Gonna have another shot at it. Maybe tomorrow though as it's getting dark now.
Drilling holes in the right place is bloody difficult without a bench dril press.
Not happy though. I was aiming for a gap of 1-2mm, but I've ended up with 4-5mm. Gonna have another shot at it. Maybe tomorrow though as it's getting dark now.
Drilling holes in the right place is bloody difficult without a bench dril press.
-
- Donator
- Posts: 5474
- Joined: Mon Jul 28, 2008 4:13 pm
- Car(s): Supercharged 2.1 (daily driver- when it works)
simple solution
get a longer bolt for the vr sensor, and space it using a couple of washers, then you can fine tune the air gap.
"Understeer" is when you hit the fence with the front of the car.
"Oversteer" is when you hit the fence with the rear of the car.
"Horsepower" is how fast you hit the fence.
"Torque" is how far you take the fence with you.
"Understeer" is when you hit the fence with the front of the car.
"Oversteer" is when you hit the fence with the rear of the car.
"Horsepower" is how fast you hit the fence.
"Torque" is how far you take the fence with you.
- Beakster
- Donator
- Posts: 3980
- Joined: Sun Jul 27, 2008 10:16 pm
- Car(s): 1983 Ford Capri 2.9 24V Cosworth Injection
- Location: Toronto, Canada
- Contact:
Re: simple solution
This was my original plan, but the bracket occupies a recess between the sensor shadt and the sensors plug. I have already had to reduce the thickness of the bracket along that edge to accomodate it. When I space it with washers it pushes it further away.
Reckon I'll just cut that part of the bracket off though as I cant be fcuked starting from scratch again.
I'll sort it tomorow with 2 or 3 1mm washers.
If anyone else wants a bracket done let me know, as once its done its easy to use as a template to make more and I got loads of angle iron left.
Cheers
-Chris
- Beakster
- Donator
- Posts: 3980
- Joined: Sun Jul 27, 2008 10:16 pm
- Car(s): 1983 Ford Capri 2.9 24V Cosworth Injection
- Location: Toronto, Canada
- Contact:
Beakster Bracket v0.2
Yo,
Redesigned my bracket today. Here's the result. This one supports the shaft of the sensor which I hope will remove the chance of any vibration introduced through the plastic lug it screws in with. It also facilitates sensor to wheel distance adjustment.
-
- Donator
- Posts: 5474
- Joined: Mon Jul 28, 2008 4:13 pm
- Car(s): Supercharged 2.1 (daily driver- when it works)
looking good mate
keep at it!
"Understeer" is when you hit the fence with the front of the car.
"Oversteer" is when you hit the fence with the rear of the car.
"Horsepower" is how fast you hit the fence.
"Torque" is how far you take the fence with you.
"Understeer" is when you hit the fence with the front of the car.
"Oversteer" is when you hit the fence with the rear of the car.
"Horsepower" is how fast you hit the fence.
"Torque" is how far you take the fence with you.